Showing posts with label Forum Post. Show all posts

February 13, 2024

Tidbit: Diesel Fireplace Heater- Tips for Installation and Use

This is one of a series of brief, no nonsense posts that we call a Tidbit:

noun; small and [possibly] particularly interesting items of gossip or information...
The purpose is to share succinct posts about lessons learned, or things we use or do that work [or don't...] that are common to many of us boaters. 

The goal is to garner feedback from those of you having first-hand experience with a better approach/ solution/ product...  
We never assume what we are sharing is the ideal or only; it just seems to best suit our needs [and/or habits and/or budget] from our experiences thus far...
Sometimes these Tidbits originate from a topic of discussion on one of the forums we participate in, and this happens to be one. [The original forum response- which includes additional details- is linked below.]

Since we encounter this question fairly often- and since it may affect other boaters- it made sense to post a more detailed response for future reference.

                   ➛ ➛ Peruse the right-hand sidebar for the up-to-date list of Tidbits ➛ ➛                   


It is rare to find a vessel that doesn't have some type of non forced-air diesel heater up here. 

Some people report continuing issues with sooting on deck using this kind of heater.

This post is a quick brain dump listing installation and usage parameters I have found to help minimize sooting. I ​rarely see any dirty decks​- ​but it can happen.​ 

Below I'll list the ranked causes of sooting with this kind of heater that I've experienced​ over time.

​I have had heaters like this on 4 of 5 boats I've owned over the past 4 decades. All were full time cruisers I used in higher latitudes. (>56°N in the Pacific.)​


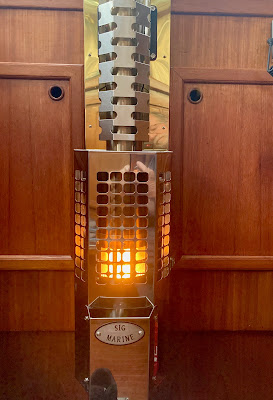
​In Fall 2021 installed a​ Sig Marine 120 (pretty equivalent to the Dickinson Newport) ​on our current boat. In winter it ​is only been off a handful of times (when the boat is unoccupied) since November while we work on some winter projects at the dock. No soot. No backdrafting. (But we have been using this type of heater in 4 boats over the past 4 decades, so the learning curve is well absorbed.)

We find the heater output is too much in our 43 ft ​ketch if ambient temps are ​in the 40's °F. We then have to open ports and hatches to keep from overheating on the lowest setting- ​if we do light it in those temps...​ (This boat has several redundant sources of heat.)​

Our ​SIGMAR ​heater is on the lowest setting most of the time- ​sometimes elevated ​closer ​to a medium setting when ​its single digits above zero F and blowing outside...

What ​experience can I share specifically about this size and type of heater with a 3" flue​?​ (Following is a ​dense ​​overview full of hints about things I think I have learned over time- only for those truly interested...)

Here is Dickinson's version for reference.


Installation is important:
  • Keep ​the total ​flue length ​a ​minimum of 6 ft, max of 8 ft

  • Straight flue is best. 
    • ​I​f you must dog​-​leg​ the​ flue​, don't use more than 2 elbows, and use the smallest angle you can- with nothing greater than 45°.
The barometric damper is properly adjusted in this photo of the heater in use.

The shield installed on top of the angled flue [to help shield the headliner]  and the vertical solid filler [right in photo] behind the perforated flue guard [left, but not showing much in this photo, but is prominent in the first photo of this post] were both fashioned from pieces cut from a single snap together 3" SS flue pipe.

  • Install a barometric damper​ [see above photo]
    • Locate it​ no further than 24 inches from where the flue exits the heater​, and no closer to the heater than 12 inches. 
      • Be sure they are improperly installed and adjusted.
        • Carefully adjust the ​barometric ​damper per manufacturer's instructions​ (I inserted a photo of our barometric damper with the heater on low, above, for reference.)​
      • Most complaints about sooting are about installs lacking a barometric damper (and occasionally from improper adjustment of one that is installed.)
    • Use an H cap​ (Charley-Nobel) in breezy conditions​. We have found it to be consistently better at handling wind gusts than the round version​ (in our testing and experience​.)
      
    This is our typical flue set-up if expecting windy conditions. The flue extension length was determined by testing different lengths and caps during the same steady 20kt wind conditions. 

    As mentioned in the main text, this 3" flue gets covered with a 4" flue sleave [note to self; need photo...] in cold weather to help maintain inner flue temperature, and consequently draft. [This 4" flue cover adds the side benefit of being cooler, and thus less threatening to bare skin and meltable fabrics the crew might be wearing in winter.]

    We remove the flue and cap it off when not at anchor or at the dock; photo further down.


    ​ We sometimes use a round cap in calm conditions- typically fringe heating season overnighters.

    • If planning to use the heater in temps cooler than about +20°F [-7°C] for extended periods, have a length of larger diameter flue pipe [4 inch diameter covers our main 3 inch flue well] you can ​temporarily ​slide over the primary flue above deck to provide a layer of insulation- helping ​to ​keep the main flue warm​ to promote a consistent draft in cold weather.​
      • This insuilating sleave adds the side benefit of being cooler, and thus less threatening to bare skin and meltable fabrics the crew might be wearing in winter.
    • Duct combustion air from ​an ​enclosed, vented space (our's draws from the engine room. This is where the bulk of the soot will go if you ever suffer an extreme backdraft.​ More below.)​

    • Install a gravity feed day tank if you don't want to listen to a fuel pump burp every second or so while running the heater.
      • Install a valve on the tank before the fuel hose.

        (Our day tank is filled by the 12 volt fuel pump that runs the tank transfer/polishing loop.)
      • The day tank overflows back into the starboard fuel tank when full.
      • Install a small shut-off valve at the fuel inlet on the heater. Develop the habit of closing it when the heater is off.

        This is a safety against fuel flowing through the overflow- draining the day tank- in the future when the small o-ring on the carburetor needle valve tip fails. (Ask me how I know this.)
    • ​Run the overflow from the carburetor to the fuel tank if possible (vs. an overflow bottle.)

      If you do this, install a valve on that port on the heater, and remember to close that valve temporarily when fueling the tank the return goes to- but only if you don't want to back-fill the heater if you overfill the boat. (i.e., fuel up the fuel fill hose- which will be higher than the heater carburetor...)​

    • ​Remove the above deck portion of the flue when the heater is not in use for extended periods, and always before getting underway.

      Secure the flue opening with the water tight cap made for the through-deck fitting installed on your boat.


    Operational considerations:

    • #1 diesel (AKA Heating oil​;​ kerosene​)​ burns much cleaner than #2 (The carburetor must be adjusted to match fuel selected​. See manufacturer's instructions.​)

    • When first turning on fuel after preheat, ​set to medium ​flame size for at least 10 mins to warm the heater and flue. Then start turning ​it ​up/ down a little bit at a time- pausing a few minuites between adjustments for the heater to equilibrate to the new setting.​ (This is not a thermostat; it is a fuel flow meter... give the heater time to adjust to each new setting.​)

    What causes sooting? (Note that sooting either vents out of flue top onto the deck, or when back​ ​pressured into boat via the combustion air intake in the bottom of the heater.)​ If [when?] it happens, either Krud Kutter, Davis FSR, and Someone To Do It cream cleaner are the magical soot removers...

    Following are the primary reasons sooting occurs, in order of their occurrence from my experience.​
    • Cause #1: Preheating the heater using diesel fuel ​with a tissue paper ​wick as the manual instructs. This causes a build up of soot in the flue and in the bottom of the burn chamber over time.

      Instead, we use ab​o​ut 3/4 of an ounce of denatured alcohol [AKA alcohol stove fuel; typically available where paint is sold]- and​ a long neck lighter instead of​ tissue paper​​ to ignite it. We​ pour the alcohol into the middle of the COLD heater chamber, turn ​the ​combustion air fan on low; lite ​the ​alcohol​ (the fan being on keeps the alcohol from 'poofing' when you light it.)​ When the alcohol flame starts going below the burner ring​ (​2-3 mins on average​) turn on the fuel flow to a medium setting, and t​urn off ​the ​combustion air fan​ (​unless it is blowing outside... more on that, below.​)​

    • Cause #2: On our stove, we ALWAYS make sure the flame is above the 'top burner ring' otherwise there is too much combustion air and not enough fuel = soot. Slightly increase the fuel flow to correct this issue.

      Side Note: that top burner ring is removable. Don't assume it is installed correctly. It can also cause a miriad of flame and soot issues if incorrectly installed. (Read the manual!)

    • Cause #3: Too much fuel and not enough combustion air = SOOT! (i.e., Too large of a flame.)

      Either decrease fuel flow, or turn the combustion air fan on and adjust the air flow to optimize the flame.

      I believe this is the #1 cause of sooting on deck: people turning the heater up too high in hopes of heating the boat faster.

    • Related Cause #3.5: As the heater warms after being first lit, in a few hours the carburetor will warm, thinning the fuel it contains, thereby causing the fuel to flow faster. This results in the flame size slowly increasing- perhaps unnoticed- and possibly getting large enough to cause sooting as described in #3.

      Be aware of this, and keep an eye on the flame. Always.

    • Cause #4: Rapid wind gusts (over 35 knots for our installation) COMBINED with negative static pressure inside the boat​​ can snuff out the flame and cause a woof when the still flowing fuel reignites in the hot burn chamber- blowing soot out every small crack and the flue and air intake openings. This is the most dreaded.

      It ​sometimes ​happens to us when we experience katabatic gusts (williwaws)- typically in glacial fjords in certain conditions. Think zero to 60 knots in ​under 10​ seconds.​

      S​ometimes ​slightly opening a hatch or port will help ​prevent a negative static pressure inside the boat ​in catabatic conditions​; ​and sometimes turning on the combustion air fan​ ​and increasing its speed to balance the wind gusts​-​ or a combination- ​helps prevent the flameouts.​
    • Cause #5: [A minor contributor] When turning off the heater (by stopping the flow of fuel) turn the combustion fan on low for the few minutes [~10] it takes for the flame to completely extinguish. (A tiny flame flickers in the bottom of the burn pot for several minutes- burning off residule fuel.) Running the combustion fan during cool-down helps prevent small amounts of soot and smoke, and clears fuel odors from the heater.

    I hope this quick brain dump is useful, and that I didn't forget anything critical.

    These heaters are very ​safe if installed properly, and ​worthwhile if you ​are patient enough to learn how to use them. It is important to be very observant as you go through the learning curve of using and adjusting this type of heater​, and develop the habit of scrutinizing the flame 
    (and adjusting when necessary) on a routine basis. ​

    ​We love the fireplace ambience that comes with the nice radiant heat.​

    Do you have any tips and tricks to share on this topic?


    _________________________


    Link to original forum post 1-Feb-2023 which spawned this blog post.


    PS: We are occasionally asked about how we installed the through-deck plate [AKA deck iron] when some of you notice we didn't use the typical teak ring to account for the deck angle.


    Ignore the chain hook and line which shows in the two photos preceeding this one.

    I was using a line to keep a small amount of tension on the top flue so it didn't lean over before the gasket set-up.


    We used Sikaflex 291. [Paintable; sandable; heat resistent; can also be used underwater...]

    Here are the basic steps we took to install the deck iron using Sikaflex as the spacer:  [Sorry, I was by myself and it wasn't convenient to take photos of every step along the way...] In fact, I suspect it took me almost as long to detail the following in writing as it did to perform the install - not including locating and cutting the flue clearance hole through the deck...

    After the hole is made through the deck: [Measure 99+ times, then drill a small pilot hole to confirm (e.g.,  A 1/8" hole that can easily be epoxied closed if the position is incorrect...)  Then cut the main flue clearance hole as recommended by the manufacturer...]

    Then...
    1. Set the deck iron flat on the deck [no wedge yet] centered over the hole.
    2. Rotate it so that the fasteners fall where you prefer them to be.
    3. Apply wide painter's tape [e.g., 2" wide] around the perimeter of the deck iron, with the centerline of the tape on the joint between deck and deck iron [half the tape width on the deck iron, the other half on the deck.]
    4. Mark where you will drill the pilot holes for your fasteners of choice.
    5. Carefully slice the tape at the very edge of the deck iron with a very sharp blade.
    6. Lift the deck iron from the deck and firmly press all remaining tape edges down onto the deck and the deck iron perimeter. 
      1. This is what will keep the Sikaflex edge neat when you are finished- with little to no clean-up needed.
    7. Insert a short length [e.g., 3" long] piece of oversize flue [4" to go around our 3" main flue] into the deck iron. Either glue it in place [a day or two before install; Sikaflex or hot melt glue would work] or use tape around the outside perimeter of the oversize flue sleave inside the deck iron. 
      1. This short piece of oversized flue serves as both additional fire proofing between the main [small diameter] flue and the edges of the deck hole. 
      2. It also prevents the Sikaflex from making contact with the main [hot] flue when you get to that step.
    8. Drill the pilot holes you marked in step #4, above, for the deck iron fasteners you chose. 
      1. Don't drill through to inside of boat... [future leaks]
      2. Use a countersink bit to create a small fillet on top of each hole for sealant to flow into, forming a permanent O-ring style gasket for each fastener where it penetrates the deck.
      3. And remember to use appropriate methodology if the deck is cored at your flue penetration location...
    9. Dry-fit the deck iron with main flue installed underneath to center in the hole in the deck.
    10. Remove deck iron again, and insert all fasteners through deck iron, and run a tight fitting, small diameter O-ring up each fastener to keep the deck iron flange tight against the fastener head. 
      1. The O-rings will hold the deck iron in position- level above the deck- while you fit it into final position just before adding your Sikaflex gasket.
    11. Put deck iron into final position, carefully screwing fasteners into pilot holes until the flange is level [not flat on the deck- unless your deck is level at that location...]  
      1. The O-Rings you installed will hold it off the deck temporarily in final position.
    12. Double-check that the oversized, short sleave [4" dia x 3" long in our case] and main flue [3" diameter for us] are exactly in position in the hole through the deck, and in the deck iron.
    13. Fill the void between the deck and the deck iron completely with Sikaflex 291. 
      1. Cut the tube to have a wide tip, and work out from the center to the circumference to help prevent air voids.
    14. Once you are sure that the cavity is full of Sikaflex, run a putty knife around the circumference to shape it the way you want. 
      1. The above photos were taken shortly after the tape was removed and the Sikaflex was still tacky.
    15. While the Sikaflex is still tacky, remove the painter's tape from both the deck [pulling tape at an angle away from the Sikaflex] and the deck iron flange.
    16. Clean up any Sikaflex that escaped the tape.
    17. Before putting everything away, remember to lay a blob of Sikaflex about the size of the cross section of the thickest part of the gasket on a piece of cardboard, and set it aside near the deck iron. 
      1. This will be your tell-tale indicator of how firm [or not] the Sikaflex is under the flange since you now wait a few days before putting any load on the deck iron... [I do this anytime I use any goop to seal something on the boat... Is it set yet?]
    18. After a couple of weeks [or whatever Sika recommends] you can sand and/or paint your Sikaflex gasket. [We left ours as-is, and looks great to us in plain white.]
    Please share your experiences and alternative approaches with us so that we- and most importantly, others- can benefit from your efforts.


    January 22, 2024

    Tidbit: Pilot Berth in the Pilot House?

    This is one of a series of brief, no nonsense posts that we call a Tidbit:

    noun; small and [possibly] particularly interesting items of gossip or information...
    The purpose is to share succinct posts about lessons learned, or things we use or do that work [or don't...] that are common to many of us boaters. 

    The goal is to garner feedback from those of you having first-hand experience with a better approach/ solution/ product...  
    We never assume what we are sharing is the ideal or only; it just seems to best suit our needs [and/or habits and/or budget] from our experiences thus far...
    Sometimes these Tidbits originate from a topic of discussion on one of the forums we participate in, and this happens to be one: Link to original post [22-Jan-2024]

    Since we encounter this question on occasion, it made sense to post a more detailed response for future reference.

                                   ➛ ➛ Peruse the right-hand sidebar for the up-to-date list of Tidbits ➛ ➛                               


    Alternate title: Sleeping around a Centre Saloon table


    I haven’t had a dedicated pilot berth for a couple of boats now. [Last was the Valiant Esprit 37; Bob Perry design.] I really liked that typical pilot berth. [A snug tube that would contain you in a rollover- although likely bruised and soggy afterwards.]

    What do we use for a pilot/ anchor watch berth in our center cockpit, center cabin Nauticat? 

    In the pilothouse, we have U-shaped seating surrounding 3 sides of a sliding, expandable [leaf] table which is mounted on a cabinet pedestal. 

    The longer [hull] side makes an excellent pilot/ anchor watch berth. [Though very rarely needed…] Do a sit up and see all instruments, MFD, etc. as well as look out the pilothouse windows, and with quick access to both helms.
    We are fortunate to have a second helm station in the pilot house so we don’t have to sleep in our foulies when standing the rare anchor watch. [Think of it as a nautical contribution towards aging-in-place…]


    A lee cloth is permanently attached to the cabinetry under the bottom cushions parallel to- and the length of- the table. 

    It is easily deployed by lacing a line between grommets along the top of lee cloth and strong eyes installed under the table top.

    When a lee cloth isn’t really needed [which is our typical scenario] we instead remove the wedge shaped back cushions from the long part of the settee [against the hull] and drop them upside down [thick edge up] into the gap between the seat and cabinet- effectively widening the berth and filling the chasm most might prefer not to discover while sleeping.

    It may be worth noting that this berth has been renamed by some landlubber guests in the past who didn’t study-up on their nautical jargon before visiting [as we do recommend on our Guest Page.] Typically this happens when our overnight guest count exceeds the number of available guest berths [very rare as we can sleep 8 without becoming overly friendly]  and occasionally when guests- who normally share sleeping accommodations- decide [not always mutually] not to [for reasons unknown to us.]

    Our other dog house offers very remote [and very basic] accommodation, but also include something unique: a guest selectable degree of separation [length of dinghy painter…]

    Both are great locations for a nap, too [weather pending…] And either could be used while underway! [Again, Wx pending…]

    _________________________________

    Related Posts:

    Sleeping well at anchor


    February 22, 2023

    Boarding Ladder Considerations [Updated Jul-2023]

    This is another in the series of Stuff we have and use and do...        (See right hand column =>)

    It may not be of interest to many of you for various reasons. (Lucky you. So go count your blessings and read no further...)

    This is more related to the higher latitudes we frequent, with the associated cooler waters...  (Or for anyone who becomes separated from the boat while underweigh...) 

    We fully realize- and have personally experienced- regions of the world where one may never wish to get out of the water... This blurb is for those of us who must, for whatever reason(s).

    We routinely examine the following questions when on our own boat: 

    • While at anchor:
      • How do we get back aboard our vessel from another craft (e.g., SUP, kayak, dinghy, etc.) 
      • How about if we are in the water? (Intentionally or otherwise...)
    • Our boat's freeboard is too high to pull ourselves back onto the boat.  
      • Are our ladders usable and always available? 
        • If not, are they readily deployable by someone in the water?
    • When deployed, does a ladder extend far enough below the water surface to facilitate easy use?  (If the first rung is at water level you need to try it before depending upon it...) 
      • How about if wearing diving gear? 
      • Or folks not in the best of shape, or slightly injured? 
    • What if someone in the water is injured? (But can still climb a ladder...)  
      • Retrieving an injured person who cannot rescue themselves from the water is a different topic.
    • How about at the dock? (Any dock...) 
      • Just as you note the locations of fire extinguishers and escape routes when visiting another boat, you also take note of any boarding ladder locations, life rings, and fire extinguishers at all docks, right? 
        • No, or none existent? Then best make sure your own boat has provisions to readily get back aboard...
    Our home port slip is too high above water level to easily pull ourselves onto. (Especially without getting a belly full of splinters, or road rash...) 
    Additionally, our harbor's ladders are a 200-300 yard swim for those moored near the ends of the floats. This is because there is only one ladder per fairway (Must be a legal/ insurance minimum?) And those ladders are round runged, center poled designs, so your numb, slippery feet-now bloodied after kicking off the thick layer of muscles- would try to slide off the ends of the short rungs, reaking havoc on your ankles and legs. But better than nothing...?
    Since we do enough stupid stuff every year (without even trying...) to inadvertantly qualify for multiple Darwin awards- in different catagories even-  we strive (whenever possible) to avoid competing unnececessarily. (And besides, since our progeny fledged long ago- as did their's- it is way too late to stop our contributions to the gene pool...)

    Therefore we do give some thought (and practice) to reboarding our boat from other floating objects- and of course the water. (Not to mention other tricky maneuvers- whether warranted or not...)

    Our re-boarding ladders are extremely basic- if not ineligant- but also very sturdy and practical.
    Speaking of basic: several boats ago, when I was much older and still semi-immortal, I had one of those collapsing rope ladders with hard rungs. I kept it hung over the side with a line hanging so I could yank it down into the water if needed. What a pain those are to climb, but again; better than nothing... perhaps... 

    Back to the present. On our current boat, we made sure the welded, folding stainless steel ladder permanently attached to our stern can be easily deployed by someone in the water. 

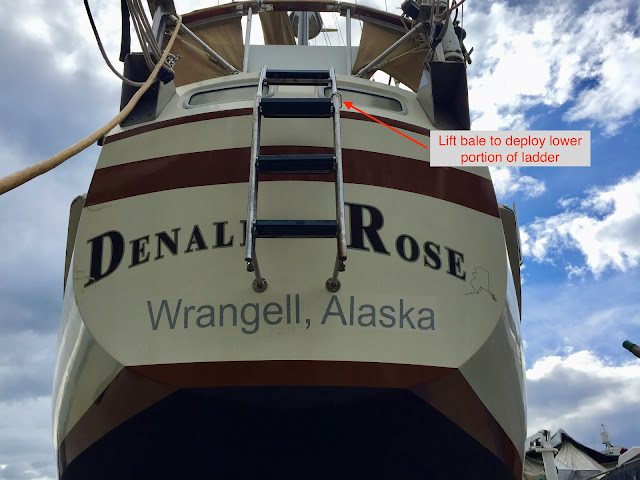
    Here is our very basic stern boarding ladder with 3 rungs underwater when deployed (unfolded so it extends below the water surface.) Note: Four underwater rungs might be better for SCUBA divers- and perhaps those of us with a higher than normal surface area to volume ratio...)


    The next photo is what it looks like in the stowed position.
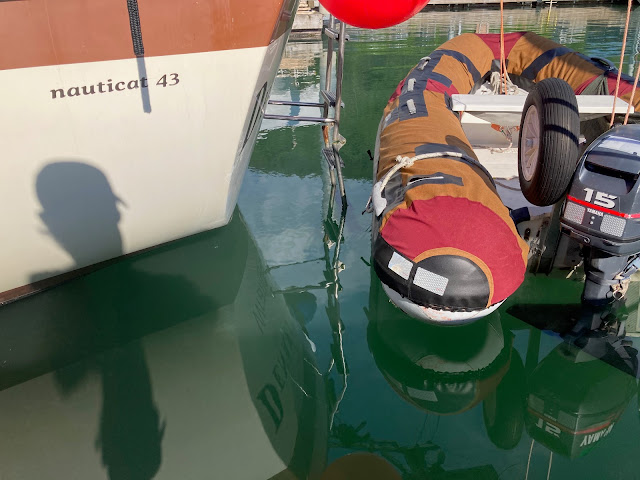
    Note it is designed so it can still be used undeployed. (e.g., For accessing the dinghy, etc.)

    Also note the sturdy stair treads thru-bolted to tabs welded to the stainless tubing rungs. These are much preferred to round tubing...


    The [whiteish] trip-line that runs up from the wire bale (simple latch that holds the ladder in folded position, upper right, above) c
    an be yanked from either side of the ladder by someone in the water. Pulling the trip line lifts the latch, resulting in gravity deployment of the swinging part of the ladder (the underwater portion.) 
    Note to selves: keep fingers, toes, noses, and any other dangly bits well clear of the ladder hinges- and noggins out of fall path- when deploying from the water... (i.e., Make sure everyone is off to either side of the ladder before deploying.


    How easy is it to access the aft deck from the boarding ladder? Our wood railing has a hinged gate in the middle of the transom to make it an easy walk-through. 

    In the following image, I am standing on the ladder using my toe to lift the latch to deploy the lower portion of the ladder. (A boat hook would be safer, but less acrobatic...)  


    Following is a photo of our midship boarding ladder: a folding, portable model which can be deployed anywhere along the toe rails on either side of the boat. 

    Here it is shown deployed at the starboard midship lifeline gate. (The top wood rail is also hinged at this point- as in the above transom photo.)


    This ladder has pins through the toe rail to secure it in place, as well as a criuser's safety line (since this ladder doesn't float...)

    Also notice this portable ladder has stand-offs that bear against the hull.
    Hint: Use crutch tips for this purpose. They are much sturdier and last much longer than the usual rubber caps you find in hardware stores. They also have a metal washer sandwiched in the thick foot so the tubing cannot punch through the rubber over time- tatooing the hull... (We find them in local hardware stores for ~$5/pair...)


    We deploy the portable boarding ladder when at anchor- offering the rare visitor easier boarding as well as facilitating loading and unloading from other floating craft (e.g., SUP, kayak, dinghy, canoe, logs, etc.)

    These are our simple methods of making sure we can always get out of the water in a hurry- even at the dock.
    One final safety reminder we regale ourselves with often:  Just as we treat the edge of the deck as we would a 500 foot cliff when underweigh, we always use any ladder as though we are climbing up or down from a 2nd story roof on a house (or the boat in the yard:)  
    Facing the ladder! (NOT with our back to it!) 
    The same applies for companionway ladders/ steep steps, etc. (For us anyway...)

    Unless, of course, one covets one of these shirts: (Lessons learned? Time will tell...)


    May 15, 2017

    The Rest of the Story - Swimming

    Did she or didn't she? I know the tension, and suspense is unbearable!


    I started swim lessons three weeks ago, with classes every Wednesday, and Saturday. I filled my water time with lap swim on Tuesdays for practice, and water aerobics on Friday. I feel fully water-logged.

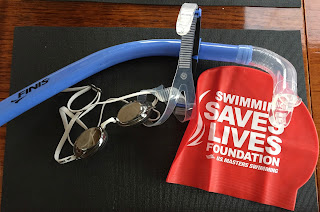
    In addition to the goggles, and swim cap we received at our first lesson, we also got a snorkel tube at our last lesson. Neat-o swag.


    We did different kinds of drills over the course of three weeks. We practiced breathing techniques with rotation from side to side, and kick boards, (breathe in with your mouth, out through your nose). Learned proper underwater gliding form, (arms extended, chin tucked in, legs together). Treading water means "egg beater legs", with swirly arms/hands.  We trained with flippers, and without, for leg kicks that are done at the hip joint, not at the knees, and "loosey, goosey" ankles.

    We used a pull buoy, which is a float you grip with your thighs, helps your legs to float while you concentrate on your stroke with your arms, (get those elbows up, and skim the water with your fingers).

    It's a cool training device, it works!

    I learned that if I felt things weren't going right, (too much flailing), I could stop, float, reset my position and my mind, and start up again. I didn't have to feel tense, I could just relax, take a moment, catch a breath, and know it's all okay. I don't need to grab the side, or stand up. This is a big step for me.

    My classmates were fun, and we enjoyed the camaraderie. I couldn't have attended this class without you, Kathy, and Maria! We spent some of our water time laughing with each other. (Notice I said with, not at.) Our instructors were helpful, knowledgable, and encouraging, Wrangell has the best! Thanks Kate, and Bruce, you were awesome! I remarked to them, that even though I have had swim lessons before, I've never had anyone break down the steps, and give such complete instructions. I have a really good understanding of how it all works now. Head knowledge, which needs practice, practice, practice for that muscle memory.

    The last lesson, required a jump into the pool at the deep end, come to the surface, tread water for a minute, and swim 25yards, the length of the pool. Did I do it???????


    Well?!?

    Did I get a t-shirt, and what did it look like?


    Learned to swim!

    Go me! You're never to old to learn!


    We enjoy comments here, or on our Denali Rose Sailboat facebook page.

    July 31, 2016

    Refrigerators and Freezers on a boat...?

    We are sometimes asked by our landlubber friends [especially those planning a visit...] how we keep 'fresh' foods on our boat [they are thinking ice cream... and beer...] And by fellow boaters how much and what type of refrigeration we have onboard... [They are often thinking how do we preserve our fresh catch of the day... and beer...]

    Well, our boat came with 2 refrigerators and one freezer. We also have 3 coolers [2 of which are a very efficient- meaning overpriced... brand.] The 3rd cooler is mounted on the aft deck and suits a double purpose as a seat- and is full of spare and dock lines for some reason...
    For perspective, this reference is for 2 full time live aboard adults- one (your's truly) with a hearty appetite. We typically have a chance to shop in a store every 2-6 weeks- not including anything we harvest [fish, colds, etc...] 
    By now you may have surmised we are definitely not vegetarians.... Only well heeled in Alaska can afford to be dedicated herbivores... Up here, when you are asked to bring a salad to the pot luck, you need to explore why you are on the fecal roster... 
    Besides, salad is what food eats... 
    But I digress...
    The main fridge is a top loader built into the boat originally, and is roughly 9 cubic feet in size. 

    It is a refrigerator only [no freezer...] and is cooled by a modern 12VDC air or water cooled [user selectable] refrigeration system and is pretty efficient. [More in related forum discussion at end of this post for those interested...] 

    The top loader easily handles our refrigeration requirements  for several weeks at a time. [Two omnivorous adults with carnivorous predilections...]
    We also keep a few heads of cabbage against the hull, and grow sprouts [we use our 25+ year old Biosta sprouter...] for crunchy green stuff after the fresh stuff runs out- or converts back to humus in the refrigerator... 
    Delicate greens don't seem to do well being tossed around- even under refrigeration- on a routine basis... Not to mention they are typically near the end of their appeal by the time they reach Alaska, let alone by the time we acquire them...  
    Either that, or they won't ripen for weeks after acquisition... [This might help explain why the Admiral- who was born and raised in Alaska- thinks green bananas are ripe... and throws away those rotten, yellow bananas... Therefore I cannot in good conscience recommend her banana bread despite her otherwise excellent baking skills... Don't worry; I won't get in trouble for this... she knows... deep down...]
    Does anyone remember the eating scene from Soylent Green? [It could have been filmed in our pilothouse a few weeks after the last provisioning run...]
    But I digress... [Again...]
    Being a top loader, it invokes angst in anyone desiring something stowed below the top layer- which is always where what you desire is located... [We use stacking baskets, but still envy front/side loaders... For those at home, it is akin to your chest freezer... What you want is always at the bottom, isn't it?]
    Here is a good article about organizing a top loader by Carolyn at the Boat Galley.
    The 2nd refrigerator is an old [ç1980s] Norcold front loader [AC/DC; 4 cubic feet?] under counter fridge. It has the token small freezer compartment on top which usually keeps our fish bait preserved well enough to reduce associated odors and subsequently the number of sideward glances at the galley slave for the day... 


    You can see the top loading refrigerator hatches in the counter top left of the stove, and the white door of the Norcold [lower left corner...] And yup, that is a microwave in the upper middle of the photo...

    The old Norcold is inefficient [energy-wise] by today's standards and is therefore slated for replacement someday... [...sometime when the main mast is removed due to its size and location...]

    We typically only use it when we have guests aboard, and in warmer weather sometimes to pre-cool drinks, etc. when we have extra electricity [e.g., when motoring or when the generator is running...] Even when using the extra capacity with guests, we typically shut it down overnight due to its excessive power consumption... 

    The 3rd is a Engel chest type AC/DC [and by that I mean electrical preference...] chest cooler secured under a lower settee bench and used exclusively as our freezer. [84 quarts] We use this full time to store proteins for our consumption [and the occasional bit of ice cream or blue berries...] Engels are very efficient energy wise, and it quickly freezes our catch of the day maintaining the fresh quality of the protein...

    We vacuum bag everything stored in the freezer [i.e, no styrofoam trays from market packaged meats- and the market will often do that for you if asked in advance...] and stack it vertically [with hand written labels on the bag tops- like file folders...] so it is quick and easy to pull what you need. [Slip items to be frozen between two frozen items and it quick freezes quite nicely...] 

    We also keep a couple 'blue ice' type of cold blocks in the freezer for picnics  and for putting in main fridge to offset heat when bulk loading during provisioning, self defense, etc.

    Perhaps worth mentioning is another refrigerator inherent with boating in cooler waters: stowing items against the hull [Yes, landlubbers, on the inside of the boat...] We routinely store a variety of items this way with great success. e.g. Beer, wine, vacuum wrapped hard, aged [4 yr+] cheeses, a few heads of cabbage, potatoes, onions [and no, the produce is not as well aged as the cheese nor wine, but sometimes ends up looking the part...]

    As you can see, in this lifestyle we suffer greatly... and so will you when you visit...

    Of course, many cruisers get by famously without any refrigeration, as did human kind until fairly recently... [Historically speaking... ] 

    Meanwhile, others cannot get by without an ice maker. [Nature is our ice maker; on a prior boat, I relied solely on glacial ice for over a decade...] However, should we ever venture to warmer climes again, an ice maker might just gain priority on our list as well...

    To each their own...


    What are your choices, and why?


    Also check out this more recent post about our galley [with photos and additional details about the refrigerators and freezer...]


    Related forum discussion: 

    Link to original forum post [19-Apr-2016]


    Re: Water Cooled Refrigeration


    Quote:
    Originally Posted by Martin S 
    What's your experience of using water cooled condensers. I am considering the ISOTHERM range. Currently I have an air cooled condenser it seems very inefficient and has the additional problem warms up the already warm cabin.
    Replacing looks reasonably straight forward. I'd love to hear from others who have tackled this. Thanks...
    Hi Martin,

    The previous owner of our boat spent 15 years in the Bahamas and S America.

    They replaced the main refrigerator compressor set-up to one with both fan and optional water cooling.

    They installed the water recirculation pump with an on/off switch and separate hour meter, and plumbed it to one of the 2 potable water tanks to eliminate raw water cooling concerns. [The boat has 2- 110 gallon water tanks and a water maker.]

    Since that compressor can be air or water cooled, and each have a separate hour meter, it was easy to quantify the efficiency gains comparing run times of water vs. air cooled [30+% based upon 2 years of data in the same region where Cooling Degree Days in the warm seasons average mid 3 figures. i.e., the higher the number, the more cooling needed to reach your desired cabin temperature. Likewise re: heating for Heating Degree Days...]

    Note that the boat is also air conditioned, but that was only as needed unlike the 24/7 refrigeration demand...

    Since we are in cooler climates with that boat now, I have experimented with turning on the water cooling that same system. It does reduce the run-time somewhat [4-10% on average depending; more on sunny summer days, and also in winter when we are heating the boat full time...] but perhaps not significantly enough to justify it if I was starting from scratch and planning to stay in cooler climates. That would of course change if/when we take the boat to warmer regions.

    Otherwise, given how happy we are with the efficiency of our Engel freezer, I also wouldn't hesitate to install an retrofit Engel compressor in our ice box...

    One last thought, depending upon the compressor you currently have, it might also be worth evaluating adding one of these newer [and intriguing] compressor optimizing devices.


    Best wishes with your project.

    Cheers!

    Bill