Showing posts with label SOP. Show all posts

March 14, 2022

Tidbit: Anchor Rode Scope Calculator [Updated Mar-2024]

This is one of a series of brief [you hope], no nonsense posts that we call aTidbit: 
noun; small and [possibly] particularly interesting item of gossip or information...
The purpose of these Tidbits is to share succinct posts about lessons learned, or things we use or do that work [or don't...] that are common to most of us boaters.

The goal is to garner feedback from those of you having first-hand experience with a different approach/ solution/ product/ or additional useful information to share...  

We never assume what we are sharing is the ideal or only. In this case it is about the attributes the builder of our boat provided for us [and some we added...] 

We share this information in case there are any points of interest for others, and to solicit things you have done that we might be interested in...

                         ➛ ➛ Peruse the right-hand sidebar for the up-to-date list of Tidbits ➛ ➛                         


Determining how much anchor rode to veer is easy, right? 
Note: In this discussion, we will ignore considerations for distancing from other vessels in crowded anchorages. This is all about determing the ideal scope for the conditions in an anchorage with adequate space to do so.
As an example, let say we are preparing to anchor for the night using our 99 lb. Spade primary bower on our all chain rode [and we always set a longish bridle...] 

Our depth sounder reads 50 ft of water. [Assuming the bottom is level.... otherwise we use the deepest depth within our anticipated swing circle...]

Beause of the depth, we know from experience a 4:1 scope ratio is very adequate [read we sleep well] for all but extreme conditions. [In which case we would increase scope up to a comfortable 5:1...]
It is worth noting that deeper water allows using less scope; shallow requires more. For example, we are very comfortable with 3:1 [or even 2.5:1] scope in 90 ft. of water with our primary bower.
So, 50 ft x 4:1 = Pay out 200 ft. of rode. 

Done.

Or are we? 

What about tidal change? [Our current playground can experience 24 ft. tidal variations.]

Therefore, we also need to determine the stage of tide when deploying the anchor [and calculating the scope] to determine the highest predicted tide [remembering storms can influence tidal measurements- among other things...] during our planned stay. [And the lowest tide if anchoring in water shallow enough to ground us...]

Most of us have tide tables built-into our chart plotters and/or apps typically displaying a nice curve— making this pretty easy to do:


But what if all we had were printed tide tables? [I can see you paper-only chart salts smiling...]  Do you remember how to use the Rule of Twelfths?

Back to our example of anchoring in 50 ft. Lets say the tide will increase another 11 ft from the time we anchor. [This is the highest tide during our planned stay...]

Easy; 50 + 11 = 61 ft of depth. 

So we should let out 61 x 4:1 = 244 ft of rode; 44 more feet that we initially figured. 

Done again, right?

Wait. Did we remember to include the height of the anchor rode [bridle in our case] fairlead above the water?

Ours is 5.5 ft... [Lets round to 6 ft.]

Okay; 50 + 11 + 6 = 67 ft.

Then lets refigure scope again: 67 x 5 = 268 ft [an increase of 68 ft from our original guestimate...]

Are we done yet?

Not quite... 

Lets also remember our depth sounder is set to read depth below our keel. Denali Rose draws 6 ft. 3 in. [we will round to 6 ft] so we also need to add this value to the depth gauge reading... [How would you know this if we didn't tell you?...]

Once more:

50 [depth reading] + 11 [predicted tidal increase] + 6 [Freeboard] + 6 [depth sounder offset] = 73 ft. effective depth during our stay at this location.

What is our desired rode length now?  

73 x 4 = 292 ft of anchor rode to achieve a 4:1 scope at highest tide during our stay.

Yikes! That is 92 feet more than the 200 we originally calculated in our head... [A 46% increase...]

If we had anchored using just 200 ft of chain, we would have ended up with a scope ratio of 2.7:1 [at the highest predicted tide during our stay...]; quite a bit less than the 4:1 ratio we prefer for this depth... [But likely adequate for calm conditions with our oversized ground tackle.]

So, we can still do this arithmetic in our head, right? 

Yes. In our [ever diminishing] attempts at staying sharp, we calculate how much chain to veer in our heads each time as we prepare to anchor.

To make this easier we simplify; there are two variables: depth and tide; and two constants [which become one]: freeboard + depth offset.

So, the simplified version is: add 12 ft. to the depth meter reading + how much higher the tide is predicted go [during our intended stay period] when we drop anchor, then multiply by our desired scope ratio, thus:

Staying with the current example: depth reading variable [50] + our constant freeboard and depth offset [12] + highest tidal variable during our stay [11] = maximum effective depth during our stay [73] X 4 = 292 ft of chain.


And lets remind ourselves, our chosen rode length is assuming a level bottom... 

What if you are anchoring on an incline? [Even a slight one...]
When figuring the angle of the rode at the anchor when the rode is under high load [i.e., is 'bar tight' or almost straight...] one only needs to measure the angle between the straight line of the rode and the slope of the seabed in the direction the anchor is set, correct? [Trick question.... more below...]

Yes. And the worse case angle of the rode is determined by the straight line between the anchor attachment point, and the fairlead the rode is first lead through on the boat... In your example, the bow eye [with the snubber- now part of the straight line rode...]

Explaination of trick question, above:

When anchoring, our goal is to keep the angle of the rode at the anchor attachment point smaller than the tripping angle of the anchor. [Typically under ~5° with modern anchors] We typically do this by letting out more scope in incliment conditions, but this common approach doesn't allow for a sloped bottom... [That is another discussion (on Cruiser's Forum) that is well worth reading...]


Image from Cruiser's Forum discussion

Are we having fun yet?

Back to where we were with our original example: 

We have determined we need to veer ~292 feet of rode. [Lets round-up to 300 ft.]

A chain counter would make this easy— especially since we gravity drop our anchor and rode. [i.e., FAST!]— but we are the chain counter... 

While the chain is whizing by, we need to keep track of the plastic zip ties screaming past  as well so we know how much we have veered... [Our rode is well marked with colored zip ties every 30 ft— or 5 fathoms... or even shots (15 fathoms of chain, or 90 ft) if that is how you think... ] 

Our marker pattern is one red ziptie @ 30'; 2 reds at 60', 3 reds @ 90'; 1 white at 120', etc. , through Blue, then Yellow... So which color, and how many are we shooting for to reach 300 ft? 
We are also experimenting with a 3 ft. length of yellow pollypropelene line woven into the chain links at each set of markers to aid visibility— especially during our typical high speed gravity chain deployments.  
So far so good... 
A cheat sheet can be handy for determining which set of rode markers we want. This is because our markers designate either foot [30] or fathom [5] increments— probably making the marking scheme more complicated than it need be... [I'm constantly rethinking this, but old habits... Keep reading to see why a change isn't a priority...]

Our chosen rode marking system [that doesn't require keeping a mental count...] helps offset my self-awareness that I can [and do...] make mental mistakes even when I'm rested and alert— let alone when I've got too much to think about when I should be concentrating on anchoring maneuvers.

Enter my dynamic cheat sheet. [Another way of looking at it is I'm basically very lazy, so it is easier to make a calculator; trust but verify— even one's self...]
 
The following screen shot of our prototype scope calculator is displaying the example values from above :


After selecting the 4 variables at the top left [Units, Depth sounder reading, etc.] the Scope ratios are calculated and color coded based upon value. [See Scope Color Key in middle right, above.]

Find the desired ratio in the Scope column and read the required length of rode.

In the same row, find the Rode Marker [colored zip ties in our case] you are looking for [Note we have two anchors, but typically use the primary bower- 99lb Spade.]

In our example, looking at the Scope Color Key for our desired ratio range, then choosing a scope from that range from the Scope column. [Notice the hot pink Preferred Scope Range column on the right is highlighting our preferred range taken from the Scope Color Key for the calculated Effective Depth. (In this example 3-3.9:1. Lets round up to 4:1 just because we can...)]  
Next we slide left to the Primary Bower Rode Marker column to find we are looking for one yellow ziptie on the chain portion of the rode to achieve 4.1:1 scope for the effective depth at the highest tide during our stay; 300 feet of all chain rode. 
If we desire more or less rode for any reason, we can choose accordingly. 


The next screen shot is a close-up of the calculator itself showing a new set of variables. 

How much scope [and which primary bower chain marker] would you choose? [Assuming no other obstacles to consider in the anchorage...]
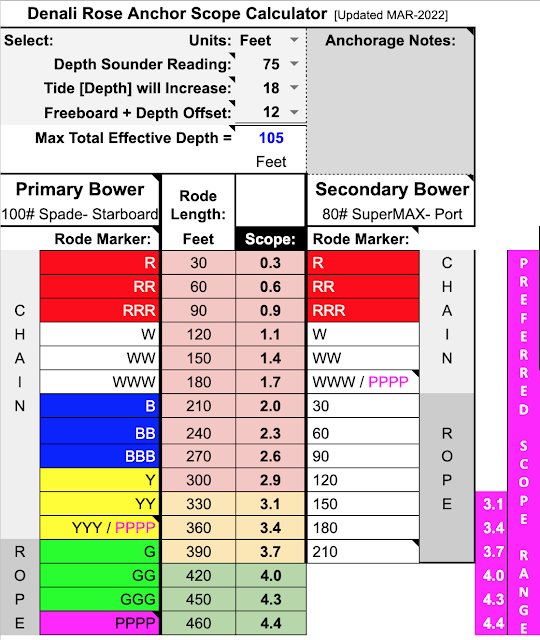
Close up of business portion of calculator showing more typical depths in our cruising areas. 

Note the color coding automatically shifts in the Rode Length and Scope columns to help guide weary eyes.

Your turn: Pretend like you are just finishing a great day of boating and [if like us...] are a bit tired and hungry [an perhaps a little dehydrated- and maybe a bit cranky...] and you are approaching your anchorage for the evening... 

Oh, and you are expecting some weather in the next couple of days, so don't screw it up...

How adept are you at calculating everything in your head now? 

Test yourself: 

Quickly calculate the rode length at 4:1-ish scope in your head for a depth sounder reading of 65 ft., consulting your tide resource for the highest tide during your stay to determine how much deeper the water well get. [Lets say 7 ft. for this example.]

Which chain marker [set of colored zip ties] are you shooting for? 

Quickly now- since you are already gravity dropping [fast releasing] the chain in anticipation of sundowners— and you just saw a pair of white zipties go by...

And your answer is?...

Here is what the calculator came up with if you want to double-check yourself:


How did you do?

Did you remember to stop short of your chosen final rode length to allow for the length of your snubber or bridle? [Our bridle adds 20-35 ft./leg depending upon how much we let out- which depends upon anticipated conditions...]

At this point I suspect most of you are wondering about my mental state [me too...]   

Do I really need to use a calculator to anchor?

Absolutely not! 

The arithmetic isn't difficult. [But building the calculator was fun- even if unnecessary...]

Typically I use the calculator in between the first soft anchor set [short scope] and the final hard set [which is performed after the total desired rode length is veered, and the bridle is deployed.]

Trust [thyself] but verify...

What are your methods of simplifying the hidden complexities of determining desired scope and anchor rode length?


Below is a link to our live calculator. Have at it... [Note: If several individuals use it at once, you may see changes being applied by others... more insanity...]

This prototype was developed using Google Sheets. [Yes, our verson also works when not connected to the internet...]

Here is the online version of our live scope calculator. You are welcome to use it online [and/or copy or download a version that runs in Google Sheets— or convert to the spreadsheet application of your choice...] 

Or print it out for your dart board...

Update 28-Mar-2024: For a calculator that takes into account all of the variables discussed above and more, it is hard to beat the Anchor Chain Calculator [app available.] 
Since its release [after we created our less capable version, above] it has been our go-to choice. Highly recommended.

It is also worth noting that a link to the Anchor Chain Calculator mentioned here was added to the list of Additional Resources shown on our calculator when it was first released [July 2022?]


Please comment if you discover any errors or omissions, and of course share your enhancement ideas.


March 20, 2019

Tidbit: Tacking the headsail with an inner forestay in place...

Or... Alternative methods of attaching sheets to headsails...

This is one of a series of brief, no nonsense posts that we call aTidbit: 
noun; small and [possibly] particularly interesting item of gossip or information...
The purpose is to share succinct posts about lessons learned, or things we use or do that work [or don't...] that are common to most of us boaters. 


The goal is to garner feedback from those of you having first-hand experience with a different approach/ solution/ product/ or additional useful information to share...  
We never assume what we are sharing is the ideal or only; it just seems to best suit our needs [and/or habits and/or budget] from our experiences thus far...
Sometimes these Tidbits originate from a topic of discussion on one of the forums we participate in, and this happens to be one: Link to original post [4-Jan-2019; A good read by sailors sharing their tried and true methods...] 

Following is an expanded version of my original reply to the above forum discussion...

                               ➛ ➛ Peruse the right-hand sidebar for the up-to-date list of Tidbits ➛ ➛                               


If your boat doesn't have an inner forestay, we hereby give you a few minutes of your life back and advise against reading any further... [Unless you are interested in using something besides bowline knots to affix sheets to your headsail(s)...]

Scenario: When tacking [or even gybing] the headsail with an inner forestay in place, the inner stay can interfere with the smooth transition of the headsail from windward to leward in many conditions...

We can always furl the headsail as we come into the wind, and unfurl on the new tack, but we would rather not have to...

We can also send someone forward to walk the sail through 'the slot' in very light air...

And in some conditions we remove the inner forestay [using the Highfield lever]. But unless sailing in very light air [making tacking the headsail easier] or beating into stronger winds, we prefer to leave it in place.

Instead, when tacking, sometimes it helps to time the release of the [now] windward sheet; waiting until the jib begins to fill on the new tack— pulling the the sail through the gap once the sheet is released.

To help mitigate snagging the typical pair of [ungainly] bowline knots on the inner forestay when tacking in lighter air, we do as many racers purport: cow hitch the jib sheets [one long sheet] to the headsail clew... [We use a cow hitch on our staysail sheets as well.]

We mark the center of the sheet line to facilitate attachment and observe if the cow hitch ever slips— and it hasn't so far... [20 years and counting with this approach.]

Worried about a cow hitch slipping under load?

Use a Prusik Knot [or even a 'short' Prusik; a cow hitch with one extra wrap]. It has the added benefit of still holding if one of the lines parted near the knot [unlike a cow hitch...]
This is also how we have always attached our anchor bridle line— with 100% success to date...
One could also temporarily seize the sheetlines right behind the cow hitch if it appeared to be slipping. [e.g., nylon zipties, seizing twine, etc.] But I have never found it necessary. Perhaps this is in part because we switch to [balance better with] the staysail once the wind picks up [depending upon circumstances...]

Another approach if worried about the possibility slipping under high loads is to run one of the two sheet ends back through the clew fitting and then through the loop so formed [a half-hitch through the clew ring...]
Regardless of attachment method, to reduce chafe we install a short length of Dyneema Chafe Sleeve on the sheets at the clew attachment point. 

The trade-offs of using a cow hitch include:
  • No quick disconnect [knife in an emergency- then back to bowlines with 2 individual sheets...]
  • A very long jib sheet to deal with when removed from the sail
    • We flake it after halving the line, so the center is first off the flake for quick affixing to the sail. This way we are passing a flake of rope through the loop instead of two long sheets...
  • The knot can slip under extreme loads
  • The knot can slip if one line parts close to the hitch
    • Both of these concerns are eliminated by using a Prusik knot instead of a cow hitch...

Other proven options we are considering experimenting with include:

To keep the preferred small knot profile but make sheets quick to remove, we could make a small, soft eye [i.e., no thimble] in one end of each sheet. Use a soft shackle through those eyes to affix the sheets to the clew. [Incorporate Dynema Chafe sleeve inside those eyes.]
Since our current sheets were new in 2014, adding a soft eye into one end of this older line would be difficult. [if even possible...] We may do this next time they need replacing...
Meanwhile, we will test how well a soft shackle attachment works for us by tying either an Alpine Butterfly Loop or a Dropper Loop in the middle of our current sheet line and affixing that to the jib clew with a soft shackle... Stay tuned... 
Do you have other solutions that work well for you?

March 11, 2019

Tidbit: Sleeping well at anchor... [Updated Feb-2026]

This is one of a series of brief, no nonsense posts that we call a Tidbit: 
noun; small and [possibly] particularly interesting item of gossip or information...
The purpose is to share succinct posts about lessons learned, or things we use or do that work [or don't...] that are common to most of us boaters. 

The goal is to garner feedback from those of you having first-hand experience with a different approach/ solution/ product/ or additional useful information to share...  

We never assume what we are sharing is the ideal or only; it just seems to best suit our needs [and/or habits and/or budget] from our experiences thus far...
Note: The original blog post [below] has been inducted into Tidbits since it qualifies, but was originally published almost 2 1/2 years before we initiated the Tidbit series in Jan-2019... 
[First published 24-Aug-2016]


                        ➛ ➛ Peruse the right-hand sidebar for the up-to-date list of Tidbits ➛ ➛                        


One of the many joys of cruising is the feeling of liberation once you gain trust in your ability to anchor, in your ground tackle, and your method(s) of maintaining situational awareness. 


Denali Rose at anchor in Traitors Bay, Alaska [Near Ketchikan...] Great bear viewing area for only a 1/2 mile walk on shore... Hence the occasional float plane brings a load of cruise ship passengers for a quick tour.

Here we are anchored in 80 ft with rocks not necessarily close to shore bared at lower tides in several quadrants, and a large, very rapidly shoaling head of the bay which is aft of the boat in this photo.  [e.g., if the anchor dragged, the depth change is so abrupt, we would go aground before the anchor reached an uphill portion to reset upon...]

Just another typical anchorage in paradise...

Trustworthy anchoring is not unlike that feeling of accomplishment earned once you can quickly- and repeatedly- parallel park an automobile in a tight spot on a steep, icy road in heavy traffic. Not everyone gets there...


But this is not a discussion about how to anchor [nor parallel park...] This is about being able to relax afterward, while maintaining awareness... 


What do we do? [Nothing unique...]

  • Trace our route into the anchorage in case we need to follow it out in the dark
  • Anchor like we're expecting 60 knot sustained winds [Force 11] with higher gusts
  • Capture the coordinates of the anchor
  • Take bearings on landmarks when possible
  • Set at least two proven and reliable anchor alarms
  • Set wind and depth alarms
  • Keep broadcasting our position on AIS
  • Illuminate the boat well at deck level- to supplement the masthead anchor light
  • Set a RADAR guard zone [when the situation warrants]
  • Stay aware
  • Set an anchor watch if needed [at least then everyone else can sleep...]

Details:


We begin by always recording a GPS track on one or more chart plotters when transiting, and especially when entering an anchorage area. [Many have tricky entrances and some require certain stages of tide as well for either optimied depth or current- or both...] 


That gives us a trail to follow should we have to bail-out of our anchorage in the middle of the inevitable tempest in the dark... [The author learned this the hard way.; a long story from eons ago (pre-GPS) but with a happy— yet expensive— ending...]


While still tracking, we scout the area(s) where we would like to drop the hook by slowly driving in a circle repersenting the anchoring perimeter. This is how we evaluate the bottom and any obstacles within our chosen anchor zone... Our forward looking SONAR is also used during this stage. 


Before dropping the anchor, we will place the boat at the position we believe we want to drop the anchor [the center of the previously scouted perimeter] and perform a 360° turn-in-place [a back and fill maneuver...] to map the bottom with the forward facing SONAR from the anchor's view if you will. This is helpful later as we watch our swing at anchor. [Are we staying within the anchoring area we already scrutinized?] 


This also helps us to properly calculate the anchor scope required at high tide- especially on a bottom with uneven depth where the depth can often change by 100% or more depending where the boat is in the circle of swing... 

Side note: The 15-20 foot tidal variations in our present cruising area have negligible effect on the diameter of the circle of swing at anchor. [Use Pythagoras' Theorem to demonstrate this to yourself...] However, the scope ratio is affected more in shallower anchorages [rare for us...] when tidal fluctuation is a significant percentage of the depth.
We always mark the anchor location and continue GPS tracking on the chartplotters and navigation apps once anchored. It is very informative to see where we have wandered while on our leash. [This is automatic on our Vesper Watchmate Vision; more below.]  It is also extremely enlightening if conditions worsen or we start getting hit with williwaws [a type of katabatic wind gust.]

Next, we always anchor as though we expect it to blow 60 knots. [Force 11] It only takes about 5 extra minutes to do this every time [and that includes deploying a bridle...] Because of this we rarely have to get up at o-dark-thirty to deal with an anchor related issue. [Our own anchor anyway...]


Okay. We're anchored. Now what?

Diligently maintain situational awareness while we enjoy doing other things...

This means staying cognizant of our boat's position with relation to land; other vessels and obstacles 
around us [above and below the waterline...]; the tide, weather, etc. 
When we anchor with the intension of leaving the boat [e.g., kayaking, a shore trip, visit another boat, or whatever...] we always wait at least an hour after anchoring to confirm our swing [wind/tide] at anchor is as anticipated, and that the anchor location doesn't move without our knowing... This also gives us time to recheck the weather, tide, anchor scope calculations, etc...
How do we maintain situational awareness full time while at anchor? [Hint: You can't if you ever plan to sleep...]

Since we spend a majority of our time in our pilothouse when on the the boat at anchor, we are always visually aware of what is going on around us [except when very dark or when sleeping...] If we are concerned about anything around us, we sleep in the pilothouse where, with just a sit-up, we can quickly glance outside. If an anchor watch is needed, the pilothouse is a comfortable watchstanding location in foul weather...


What about when we both sleep with no anchor watch? [i.e., normal circumstances...]

We typically set multiple anchor alarms, may set RADAR guard zones, always transmit and receive AIS, always depth and wind alarms, and sometimes marine radio(s), etc. as needed.

On prior boats in the days before GPS [and then for a time, dithered GPS; hence no accurate anchor alarms] a tell-tale compass in one's berth area was somewhat handy to help with orientation when awakened at anchor and during a passage. But it didn't show one's position nor surroundings. One had to get up and look around.


Another habit from the old days is taking some bearings on lights, landmarks, etc. I can also spot in the dark. [e.g., lights, some high points on land (e.g., unique trees, rock formations, mountain tops, etc.)— the silhouettes of which would be discernable in the dark.]

Now, we always set anchor [and depth and wind] alarms on our Vesper Watchmate Vision AIS transponder. We will often also set an anchor alarm one of our Zeus2 MFDs. 

And depending upon circumstances, we might also set one or two tablet anchor alarms and RADAR Guard Zone alarm(s).

If we are within cell phone range and plan to be away from the boat, we used to* also set a geofence on our remote vessel monitoring system— essentially a remote notification anchor alarm [among other alerts... e.g., bilge pump, battery status, etc.]
* Our older remote vessel monitoring system was dependent upon 2G cellular data— which has been deprecated worldwide. We haven't upgraded yet. 
We can also set up remote anchor alarm notifications using two iPhones [one on the boat] using the Remote feature built-in to several navigation apps. [More below]


What Anchor Alarm apps do we use on tablets/ smartphones?
[Also see the Additional Resources section at the end of this article for more info.]

For back-up anchor alarms [on our smart phones or tablets] we currently use either Anchor! and/or the anchor alarm function built into the AquaMap Marine or TZiBoat charting apps. Thus far we find them both to be the best, most robust, adjustable, and detailed graphic anchor watch applications available...

As brought up in the comments section, below, false alarms can be a sleep-depriving nuisance when using anchor drag alert apps. [Usually due to momentary loss of GPS signal— and in the case of our Vesper Watchmate, momentary loss of wind or depth data on the NMEA2000 network.]
What might help? Add user adjustable delays before an alarm is sounded, and more granular sub-settings.
As an example, AquaMap Marine has the best alarm tunability I have seen so far:

Update Apr-2023: AquaMap announced cell phone to cell phone anchor monitoring so you can be alerted if your anchor drags while away from yor boat [in locations with cell signals at the boat and your location. [Not shown below.]


For information about other boating related applications we are using/evaluating, see our maintained page about Computers, Devices, and Applications.
All redundant alarms are set with ever increasing- but safe- parameters. The goal is for them to sound one at a time [if things are happening slowly...]

Setting several alarms takes very little time and provides the needed redundancy for our comfort. [On those rare occasions when it is important to be awakened by an alarm clock (e.g., to catch a flight) we set two; this reduces inclination to wake up toandpeek to see of a single alarm failed to awaken us...]
An important note about the geometry of anchor alarms: 
Are you familiar with the GPS position error [up to 2x...] so common in most anchor alarms? If not, read this article from Boat US- which includes description of a fail-safe technique for setting two alarms on different apps.
Note that Vesper AIS transponders with anchor alarms updated in 2016 compensate for this error, as do the two apps I cited above.
Do you know of other products that compensate for this error? Please let us know by leaving a comment.
We also each have tablets with very accurate built-in GPS running navigation software as well as a mirror of the MFD showing the vessel's position and an overlay RADAR image, etc. These are always within reach- especially when sleeping.

If expecting weather or vessel traffic, or if either occur unexpectedly, we set zone alarm(s) on the RADAR [our 4G consumes very little power...] to warn of other vessels [or land, etc.] encroaching on our comfort zone. 


The RADAR image is also viewable on our tablets- which is handy when awakened by a RADAR alarm while sleeping. We can quickly assess and mute the alarm from the tablet, and of course get up if necessary, or roll over and go back to sleep if not... [e.g., a dinghy passing through our RADAR watch zone is not worth getting up over unless they are coming to see us...]


Changing the depth alarm to suit is also important to us on those rare occasions we anchor in water shallower than 60ft at low tide... [This is another anchor watch function of the Vesper Watchmate Vision AIS.]


The Vesper AIS also allows us to set wind alarms [directional and/or speed changes.]


If we could only set one anchor alarm, which one would we choose today?

Without question it would be the Vesper Watchmate Vision AIS. [It is always set first regardless...]
If we didn't have the Vesper, then we would choose one or both of the anchor alarm apps mentioned above. [Which we typically use as back-ups anyway...]

Update Feb-2023: Vesper has been acquired by Garmin. Garmin has decided to discontinue all Vesper AIS models except the Cortex. The Cortex has an even better anchor alarm that what we describe here. We will continue to use our Watchmate Vision AIS until it no longer serves its purpose.  

Why is the Verper our unequivocal first choice? [From the manufacturer's website:]

Safety at Anchor – Anchor Watch


Every sailor knows that being at anchor is no guarantee of total safety. In particular, anchors can drag without those on board being aware. Thanks to Anchor Watch, however, you can be safer and sleep well at night. That’s because Anchor Watch sounds the alarm if you drift outside a zone defined around your anchor position. Activate the anchor watch when you drop the anchor touching the Vision screen or using a mobile device to activate it remotely from the windlass or anywhere on-board.

Wind speed, wind direction change or minimum water depth alarms


Get added safety at anchor by setting wind speed, wind direction change and minimum water depth alarms and take quick precautionary action when these alarms are triggered.

Move Anchor Position


If your Anchor position needs fine-tuning after you have marked it, you can do that with the Move Anchor Position.

Breadcrumbs.


Vision plots your position in relation to the anchor and marks your positions over time for easy visual identification if you are dragging. It also works well on smartphones and tablets.
Enhancement suggestion for Vesper [Now Garmin- which deprecated this model…]: 
There is one feature I believe would make the Vesper Watchmate Vision Anchor Alarm even more useful; being able to choose screen orientation.  [Update: Now available on their Cortex model.]
Currently it will only display North-up. There are times when it would be far handier if it would display Heading-up. However, I realize this could make the view jump around and not be useful in certain circumstances...  [But then we could switch back to N-up just like a chart plotter...] 

What about the flip-side: helping others become aware of [and see] us?


Proactive measures include:

RADAR: To improve the chances of returning a strong RADAR signal, we have a large Blipper radar reflector mounted high on the main mast. [I imagine some may wonder why we stow a fender way up there...]

AIS: We also broadcast our position on AIS 24/7 when away from a dock. Additionally, our Vesper Watchmate Vision AIS transceiver allows us to tune alarm thresholds for different scenarios [including AIS Filters, depth, and wind direction and velocity.] Therefore, while at anchor we don't have any distant vessel alerts waking us up- only potential close encounters as established by values we set... [And the AIS is wired to an optional, very LOUD external alarm...]


Like our B&G Zeus2 MFDs, the Vesper Watchmate Vision is viewable [and controllable] via WiFi on our smartphones and tablets...

Improved Visibility: To enhance our vessel's visibility to others when we are at anchor in the dark [remember it doesn't always get dark overnight in higher latitudes during summer...] in addition to the masthead anchor light, we also deploy 2 portable anchor lights; one on the inner forestay on the bow about 12 feet above the deck [and under the black anchor ball day shape] and one amidships- typically inside the cockpit enclosure to serve two perposes. We have a 3rd anchor light [like the portables but with a mounting bracket] permanently mounted on the stern davits- which also serves as a 'dinghy garage' light...
Article discussing where to display your anchor light(s).
And what do the international rules say? (COLREGS Anex I)

(i)All-round lights shall be so located as not to be obscured by masts,
topmasts or structures within angular sectors of more than 6
degrees, except anchor lights prescribed in Rule 30, which need
not be placed at an impracticable height above the hull.
(ii)If it is impracticable to comply with paragraph (b)(i) of this section
by exhibiting only one all-round light, two all-round lights shall be
used suitably positioned or screened so that they appear, as far as
practicable, as one light at a distance of one mile.”
Here is an excellent article in Practical Sailor covering supplementary anchor light choices.


Denali Rose from ~2.5 miles- taken with a smartphone camera from our dinghy.
Masthead anchor light is off in this photo; you are seeing 3 of these portable anchor lights. Bow is on the right in this photo. (Highest light.) There are no shore lights or other vessels in this (calm) anchorage- which is the norm for us. [Note that the snip of red light seen in the photo is showing through a cabin port; i.e., it is not a NAV light.]


These deck level anchor lights are visible for 2+ miles and, since they hang upside down, do a nice job of illuminating the deck, too. This makes our boat very visible both from both water level and a distance. [Mast head anchor lights are difficult to spot/ triangulate from water level when close-to. Ours is 60 feet above the water, so we rarely use it...]

All [4] of our LED anchor lights have dusk-to-dawn photo sensors, so they are self managing.

Of course, it never hurts to keep the habit of flying the appropriate day shapes as well... [This is enforced in some areas/countries; for our sailboat a black sphere while at anchor, and a black cone pointing down while motoring...] 


Dayshapes signal our vessel status in daylight to anyone near enough to care...

And we can always hail them on the Marine VHF radio...


Reactive measures

What do we do when other vessels enter our self proclaimed 'safe zone'? [e.g., A 200 ft radius Guard Zone set on the RADAR.]


Illumination and light signals:

Remember, our deck is already well illuminated and defined by the 3 deck level and an optional masthead dusk-to-dawn anchor lights...


The first thing we do if there is vessel traffic encroaching on our safe zone in the dark is turn on our two LED deck lights [one on each mast of our ketch...] 

We have a switch next to our berth as well as in the pilothouse and cockpit. We can also turn the deck lights on remotely with our smartphones via the remote vessel monitoring system when we have cell signals. [This is handy when returning to the boat from the dinghy, kayak, or when on a dock.]

This adds even more light to our deck, and perhaps indicates to the other vessel we know they are there...

We can also activate a 900 lumen 'back-up' light on our stern from within our sleeping cabin. [In the future, once we install the forward looking LED 'headlights' for night running, we will add the ability to activate them remotely as well.]

On the masthead there is a (SOS) strobe light which I wouldn't hesitate to activate if warranted.

We also have a variety of extremely bright, portable signaling devices, flashlights, emergency dive lights, floodlights, and long distance spotlights [all of which have rapid strobe functions, and several with automated SOS] we can use to gain the attention of another vessel in our vacinity.

In addiiton to handheld lights, we can also deploy one of our laser signaling devices [kept with our PFDs.] 

Not to mention pyrotechnic flairs...


Sound Signals:


We also have a switch in our sleeping cabin [as well as both helms] that allows us to sound the air horn [and a klaxon] if necessary should we decide a wake-up call is warranted for another vessel... [Or to alert uninvited guests on deck we are aware of their presence, which is a non-issue in our current cruising grounds— unless herons count...]


In dense fog, or if we have to anchor in a non-traditional area [e.g., an emergency requires we anchor where we are- possibly in the open location or fairway where other traffic might not expect it...] or other extenuating circumstances requiring appropriate sound signals, we broadcast the appropriate sound signal over the PA horn via our VHF radio. 


The PA is also useful for one or two-way communication, so we can speak to others if needed.  Since it is also a microphone, we can hear waves, other boats, people talking, fog horns, etc.— especially useful when motoring in poor visibility...

We can also use our very loud Storm whistles, oral blow horns, and portable compressed air horns.


And we can always hail them on the Marine VHF radio...


Conclusion:


Using these techniques and approaches, we typically sleep very well at anchor- but always with a heightened level of situational awareness.

All of these modern electronics consume so little power that we don't hesitate to avail ourselves of their charms as needed.

Of course, we don't rely solely upon electronics to keep watch- they are like any other aid to navigation; we don't count on any single one... Instead we post anchor watches during times of concern [regardless of reason] and I always check the physical world anytime I have a 'feeling' [What was that?] or am up for any other reason...

Always anchoring as if it will blow 60 kts with excellent, proven ground tackle and having a selection of trustworthy, dependable, proven electronic aids to back-up our physical monitoring enhances our levels of relaxation and comfort while at anchor. [And we are typically the only boat at anchor where we are exploring these days...]

Do you take any special measures to to help you relax while at anchor? 


Favorite Sundowner recipes included!  Please leave us a comment.


Related resources:

Denali Rose Ground Tackle Inventory
Computers, Devices and Applications we use