Showing posts with label Planning. Show all posts

March 27, 2024

Tidbit: Walkie-Talkies [GMRS Radios] for casual comms

This is one of a series of brief, no nonsense posts that we call a Tidbit:

noun; small and [possibly] particularly interesting items of gossip or information...
The purpose is to share succinct posts about lessons learned, or things we use or do that work [or don't...] that are common to many of us boaters. 

This post is also worthy for listing in our Stuff we have and use sidebar —>

The goal is to garner feedback from those of you having first-hand experience with a better approach/ solution/ product...  
We never assume what we are sharing is the ideal or only; it just seems to best suit our needs [and/or habits and/or budget] from our experiences thus far...
Sometimes these Tidbits originate from a topic of discussion on one of the forums we participate in, and this happens to be one: Link to original post [27-Mar-2024]

Since we encounter this question on occasion, it made sense to post a more detailed response for future reference.

                               ➛ ➛ Peruse the right-hand sidebar for the up-to-date list of Tidbits ➛ ➛                               


Many users [ourselves included] use hand held Marine VHF radios to maintain comms when some or all crew are off the mother ship [on land or other watercraft] in remote areas.

Sometimes these are not appropriate- especially if you need to issue radios to several different guests off exploring in different directions since other vessels in the area might also hear the conversations [and we might occupy marine channels those actually boating need to use…]

Therefore, we have always keep a few [5; lost 1 over the years] cheaper, general use GMRS radios onboard for years for the same purpose. 

They work great. 
And once [so far…] on a remote kayaking trip, these radios were of great assistance during an emergency when one of 3 of kayakers [each with their own GMRS Radio] broke their wrist [during inclement weather; e.g., It was a dark and stormy night…] because of a fall on ice while hiking alone. 
There are several Walkie-Talkie radio types available, and are well described on this forum post.
Note: Last I knew [in the US anyway] technically you need an FCC license to use the high power GMRS channels, but that may have changed.
We issue them to guests whenever they are venturing off the boat [e.g., kayaking, SUP, dinghy, or hiking on land- remote or in a town.]
For safety, we do also issue those off on their own waterborne adventures from the mothership Marine VHF radios [and PLBs] for emergency use. [e.g., As we tell visitors ‘In case the mothership is struck by a meteor while you are away…’]

Coordination with users who may not be used to using radios:

About 15 years ago, we color coded ours with a wrap of different colored electrical tape on each antenna [useful when wanting to hail someone anonymously; original tape is still going strong…]

Photo taken Mar-2024; Taped applied ~ 2008?

We have fun making up bogus call signs:  [Sounds cool and officious; Less prone to interruptions by other radio users not in your group in crowded locations- like big cities- where we would likely be using cell phones anyway…]
Charley-Alpha-Kilo-Oscar, this is Charley-Alpha-Kilo-Bravo 
[Candy-Ass Kayaker Orange (antenna tape), this is … Blue…]
For distance use when separated, our protocol is to start/ hail first on a specified low power channel (e.g., GMRS 13; 1 watt- for better battery life) then, if unsuccessful raising the other party(ies), switch to a specified high power channel (e.g., GMRS 14; 5 watts?) and try again… [This works best with a comms schedule- e.g., everyone check in every 30 mins.]


Battery considerations: 

We prefer electronics that can use the Panasonic Eneloop rechargeable batteries [AAA, AA] we standardized on almost 20 years ago [still rate among the best for low self-discharge rates; e.g., long shelf life once charged.] This is so we can issue spare batteries for the GMRS issued to those traveling a distance from the boat [just in case… There aren’t any charging stations handy when traveling by kayak, sup, or hiking in remote locations…]

Sidebar: Radios are half - duplex [only one can speak- or more accurately, be heard- at a time, and then you have to release the PTT button to listen… If you want to…] Even if VOX [voice activation] is used. This is very adequate for most of our use cases, and what VHF radio users are used to. [This paradigm is also perfect for certain couples; some have even confided they found that judicious use of their personal volume control very satisfying…]
But for ‘real time’ comms on the boat [volume up; e.g., anchoring, hauling anchor, mooring, etc.- especially in sporty conditions] we prefer full-duplex headsets [you can still hear the other person if you are talking- like a phone; no PTT (push-to-talk) button.]. Nothing missed that way…

We do recognize that some relationships claim to attribute their longevity to only one member being able to [or being the only one to ever] speak [be heard?] at a time [half-duplex; the other party remaining silent until the speaker is finished- reportedly sometimes for long periods thereafter- or has released the button on the radio in our case…] 
But there are situations when the ability to interrupt is necessary [if not sometimes risky…] hence our preference for full-duplex headsets for real-time comms during boat maneuvers… [Always with carefully modulated volume— of one’s own voice of course. After all, they didn’t nickname these headsets ‘Marriage Savers’ arbitrarily…]


Please share your experiences, choices, and recommendations. We learn something new every day…


February 18, 2019

Tidbit: Solar Panels in mid and high latitudes [AKA DC Power Management...] [Updated Aug-2023]

This is one of a series of brief, no nonsense posts that we call aTidbit:
noun; small and [possibly] particularly interesting item of gossip or information...
The purpose is to share succinct posts about lessons learned, or things we use or do that work [or don't...] that are common to most of us boaters. 

The goal is to garner feedback from those of you having first-hand experience with a different approach/ solution/ product/ or additional useful information to share...  
We never assume what we are sharing is the ideal or only; it just seems to best suit our needs [and/or habits and/or budget] from our experiences thus far...
Sometimes these Tidbits originate from a topic of discussion on one of the forums we participate in, and this happens to be one: Link to original thread [30-Dec-2018]

Since we are asked this question often, it made sense to post a more detailed response.

                  ➛ ➛ Peruse the right-hand sidebar for the up-to-date list of Tidbits ➛ ➛                  


Original Question from Cruiser's Forum:

Re: Solar panel output high latitudes?

Quote:
Originally Posted by sailingrock View Post
Above 50 degrees latitude, what kind of output will solar panels produce in the real world. "Real world" as in typical weather conditions?

...

My response:

Following are two real world solar panel installations which include accurate data gathered a bit further north of 50°—  on the E Pacific side of things... 
Note: I'll provide electrical data in watts [other values listed are nominal...] so you can crunch the numbers to derive your own conclusions and decisions based upon your individual electrical system and requirements... 
Also note that climate is likely as much, if not more of a factor than latitude [addressed below...]

If you need a math refresher: [within the context of this post...]
Watts [W] / Volts [V] = Amps [A]  Power
Watt-Hours [Wh] / Volts DC [V] = Amp-Hours [Ah (at specified voltage)] Energy
1 Kilowatt-Hour [kWh] = 1,000 Watt-Hours 


Here are three handy online calculators:   


Background and reference:

We live onboard our boat fulltime, and are away from the dock [cruising and anchoring] ~9+ months each year.

Denali Rose's house battery bank capacity is ~10.8 kWh [~10,800 Wh, or ~900 Ah @ 12V DC (nominal) flooded lead-acid (FLA) batteries...]

Our average daily [24hr] energy consumption [averaged annually] is ~2.2 kWh [~183 Ah]. This includes running 2 refrigerators and 1 freezer full time, a variety of LED lights, computers and related devices, inverter for AC, the Espar diesel heater and ship's electronics much of the time... 

Our 12V DC charging sources include:
  • Battery chargers powered by either shorepower or an onboard 10 kW AC generator [2.2 kW combined capacity, all programmable]
  • Alternator on the engine [1.4 kW with programmable external regulator]
  • Solar panels [3 totaling 460 W; each with its own programmable MPPT controller]
  • KISS wind generator [300 W]


First mid latitude solar panel example: [SV Denali Rose]

We cruised between 55° and 59° N along the SE coast [Inside Passage] of Alaska during 2018. 

The 3 solar panels [460 W combined] on our boat each have their own Victron MPPT 75/15 controller. This not only helps mitigate [isolate] the affects of partial shading [i.e., loss of output] of a single panel, but also provides redundancy [two panels could share one controller if one became inoperative. 
Here is a simplistic but effective demonstration of the effects of partial shading, and also compares series to parallel wiring of solar panels.
Our 3 controllers share one battery voltage/temp sensor installed on the house bank, and are the sources of the solar output data in the 1st example, below. 
It is worth noting that in our current latitudes, our house bank rarely achieves 100% state-of-charge [SOC] when we are not on shorepower. Therefore, the MPPT solar panel controllers are in a constant Bulk charge state. [i.e., outputting maximum possible into the battery bank when they are active; 100% Bulk duty cycle.] 

The following data is for the calendar year 2018: [Aggregated data for 2019-present on will be published one of these days, but as of Aug-2023 the data still support the same conclusions...]

1) One 130W panel on top of bimini. 
New in 2005; slightly pivotable. More frequent shadowing in this location— mainly from the 2 masts [and occasionally, a crewmember...]
The Victron controller reported it produced a total of 49 kWh in 2018:

You can just see a corner of the solar panel on top of the bimini, and the horizontal tubing it pivots on.
[and our first mate, Gus...]


2) Two 165 W [330 W combined] mounted side-by-side as one assembly on top of davits. 
New in 2017; Pivoting to optimize sun angle. Typically fewer shadows than bimini top location.

These 2- 165 W panels produced a combined 193 kWh in 2018.

Here the panels are temporarily leveled to provide easy access to the ladder on the transom...
Note the shadow [from the mizzen boom..] on the starboard panel. 


What was the approximate solar panel yield on Denali Rose for 2018?

Combined panel energy yield: 
  • ~49 kWh [bimini]+ ~193 kWh [davits] ≈ 242 kWh [total annual yield]
  • 242 kWh [total annual yield] / 2.2 kWh [average daily consumption] ≈ 110 days of electrical consumption coverage from our solar panels

What percentage of our annual energy consumption does this represent?
  • ~2.2 kWh daily consumption x 365 days/yr ≈ 803 kWh/year total consumption
  • ~242 kWh [total solar/yr]  / ~803 kWh [total annual consumption] ≈ 30% of our total 12V DC energy needs were replenished by our solar panels.
Even though this result is a very simplistic average [one that ignores many other variables- including seasons...] it is an indication [for us...] that our solar panels are worthwhile...


Other factors influencing insolation on the boat [besides latitude...]: 

Aside from boat infrastructure shadows [e.g., masts and booms...] on the panels, and weather, we are also subject to geographical factors that affect solar gain on the boat. 

For example, we often anchor in locations surrounded by tall mountains [e.g., 3-7,000 ft]. This often results in shorter periods of direct exposure to the sun in summer, and blocking it completely in winter... [Take another look at the photos above...]

I strongly suspect climatic factors affect insolation even more than latitude. For estimating climate and weather related factors [e.g., solar intensity and exposure periods, and percentages of cloudy days...] I like to use Weatherspark.com and Climate.gov.

We also optimize any potential gain from our solar panels by running the generator early in the morning [i.e., before the sun is intense enough to power the solar panels...] on days when the house bank needs a deep charge. [i.e., is approaching 50% SOC]

The battery chargers will get the bank back to 80+% SOC fairly quickly. The solar panels will continue bulk charging during the sunny portion of the day. [This is less important in winter months when days are short and solar gain is minimal...]


Second high latitude solar panel example: [monthly data from an optimized (auto sun tracking) land based system @ 65° N]

Family members in interior Alaska have 2 large grid-tie auto-tilt/tracking [max possible-output] solar arrays on a mountaintop [i.e., optimized insolation for the location...] 

The 2 multi-panel arrays have a combined capacity of 5.5 kW.


Their data [kWh] follows: [Note the 2nd array went online in 2010...]

Go to live data 


Another personal demonstration of the efficacy of solar panels at mid latitudes:

We also have a truck camper and 2 enclosed trailers stored at 56° N. 

Each has its own 100 W rigid solar panel [3 total; each with their own PMW controller] on an adjustable rooftop mount— which is typically tilted ~55° when stationary for long periods. [This angle also helps shed snow...]

These panels keep their respective 2.4+ kW [200+ Ah 12V DC] battery banks topped up year around
The truck and camper each have 2 batteries [4 total] maintained by one 100W panel. 
One of our trailers also has the batteries from our two ATVs tied into that trailer's solar panel circuit with individual DC - DC chargers...


I hope this will help you determine whether solar power is worthwhile for you in the latitudes and climates you are considering.


Related Resources:


_______________________________


PS to SELF: DON'T CHANGE THESE IMAGES AS THEY ARE LINKED TO THE ORIGINAL FORUM RESPONSE...

February 5, 2019

Tidbit: Anchor retrieval when the windlass fails...

This is one of a series of brief, no nonsense posts that we call a Tidbit:
noun; small and [possibly] particularly interesting items of gossip or information...
The purpose is to share succinct posts about lessons learned, or things we use or do that work [or don't...] that are common to most of us boaters. 

The goal is to garner feedback from those of you having first-hand experience with a better approach/ solution/ product...  
We never assume what we are sharing is the ideal or only; it just seems to best suit our needs [and/or habits and/or budget] from our experiences thus far...
Sometimes these Tidbits originate from a topic of discussion on one of the forums we participate in, and this happens to be one: Link to original post [6-Jan-2019]


Since we are asked this question often, it made sense to post a more detailed response.


                               ➛ ➛ Peruse the right-hand sidebar for the up-to-date list of Tidbits ➛ ➛                               


Scenario: You are at anchor and it is time to go, but your windlass won't cooperate.
What are your contingency plans?

We have three:
  • Retrieve the groundtackle without using the windlass
    • Hand-over-hand
    • Line to winch
  • Use one of the manual modes on the windlass
  • Abandon the groundtackle and plan [hope] to retrieve it later
I'll start out mentioning that manual retrieval [hand-over-hand] is not likely [in our case...] unless we are in very shallow water— which is rare to never...  

Why not? Our primary bower is a 99 lb. Spade anchor on 5/16 in. G43 chain @ 1.1 lb/ft; We typically anchor in 40-90 ft., leaning toward the deeper side of that spectrum.] 
The dead lift over the bow roller in ~40 ft of water is in the neighborhood of 150 lbs., and approaching 200 lbs. in 90 ft of water... [Here is our complete ground tackly inventory for reference.] That is way too much for me to haul in [but Donna may wish to give it a go...] and not very safe for even a 'deck ape'; especially in sporty conditions...

What about using the windlass in manual mode? 

Our windlass has two manual [i.e., no electric motor] options [all use standard winch handles] for cranking in the groundtackle: 

  • There is a winch handle socket on each end of the axle supporting a chain gypsy
  • On top there is a 'kedging' socket that spins the same shaft the motor does, yielding over 10,000 lbs of pull with 30 lbs of force on a 12 in winch handle [30 ft-lbs] ... but the kedging socket is of course the slow option... 


LightHouse 1501 windlass


I have tested our Milwaukee drill assembly on a gypsy axle socket to test this scenario, and it works great. The battery easily lasted completely retrieving 360 ft. of chain from a depth of 70 ft. [We have 2 batteries...]

It retrieves at about the same speed as the windlass motor [~33 ft/min] but without the benefit of any gearing in the windlass- so all torque is supplied by the drill motor... 


Complete Cranker


The drill motor works well in the kedging socket also, but that is geared way down so it is not for quick retrieval, but will free an anchor if needed- or pull with great force [10k+ lbs] in a kedging action...


What if the windlass doesn't work in manual mode?

Driving the windlass using one if it's winch sockets will work if it is an electrical failure, but not for certain mechanical failures. [e.g., a bearing seized, the gears striped, etc; not likely, but possible...]

In that case, we would use a line with a chain hook to the anchor chain [or a rolling hitch] to a winch to retrieve the groundtackle in ~25 foot increments.


What about an emergency ditch and run scenario?

In an emergency situation where we wouldn't have time to retrieve the groundtackle, the plan is to let the rest of the rode out by opening the clutch on the windlass and letting it rapidly gravity deploy. 

The end of the rode is attached to the boat with ~8 ft. of 3/4 in. line. This leaves about 2 ft. of chain on deck from the bow roller. 

Our game plan is to secure several of our large round orange fenders to one end of a 100 ft. length of leaded crab trap line. [Leaded line sinks, so that helps reduce the chances of fouling the prop...]  

The other end of that line would be fair led and secured to that last bit of chain on deck, then that line and the floats would be tossed into the water.  
The purpose of using 100 ft. of leaded line is so the floats don't have to buoy the weight of the chain in deep water...
To finally free the boat, we would lastly cut the line attaching the chain to the boat. [Hence the expression cut and run...]

Please share your recommendations if they are different from what we have planned...

January 27, 2017

Windlass Installation Details

This post is a detailed supplement to our post about installing our new windlass. [Read that one first...]

Following is a storyboard of photos [with detailed annotations] demonstrating and describing the retrofitting of a new Lighthouse windlass on Denali Rose's foredeck. 

Original Nico Marine windlass (ç 1983) and 3/8" BBB chain.  

The green tape is what I used for marking the layout of the new windlass. [Note: Starboard chain is not in its gypsy in this shot; it is temporarily draped over the clutch wheel so it is out of the way for measuring.]


Laying out new windlass.

Note: the anchor locker divider (3/4" marine plywood-resin coated) is intensionally off-set slightly to port. [i.e., The starboard locker is larger and so will be used for main bower...]

Triangular top [deck] plate is in the lower left of this field drawing, and is shapped to match the existing raised section on deck. The rectangular backing plate is on upper half of drawing.

Out with the old... and reconfirm layout...


Dry fitting new deck plate; marking bolt holes for drilling. The yellow canister is the windlass motor encased in a kevlar wrap with a molded urethane base that has a removable bottom to accommodate water tight wire penetrations.


Swiss cheese deck from old and new windlass holes. This is why I had the custom deck plate and large backing plate fabricated. [Both are 1/4" thick 316 stainless steel and will be bonded with 3M 4200UV- VS. 5200- to accommodate future removal if necessary...]

Note: Nauticat does not use any coring in their hand layed-up fiberglass hulls- including the deck. The deck was just shy of 1 inch thick were these holes are.


Backing plate placed on top of deck plate [for reference] to demonstrate layout and coverage...

The backing plate lower right corner [in photo] is notched because I didn't have time to remove the old foot switch which has a ~2 hole through the deck. This hole will become a small, clear deck plate for viewing the propane A-B switch in the future.

In retrospect, I wish I had removed the rectangular grey cover securing a since abandoned 12 VDC outlet, and extended the SS deck plate over that hole as well...

Also note the 2 inch ID tubes welded to the backing plate where the two chains lead through  [i.e., hawseholes...] Those tubes are long enough [1 inch to match deck thickness- per my request] to mate with the SS deck plate [protecting the non-cored deck from the anchor chain] and extend another 2 inches into the anchor well. These are for clamping 2 inch ID exhaust tubing to for leading the chain in the chain locker [and quieting any rattling...]


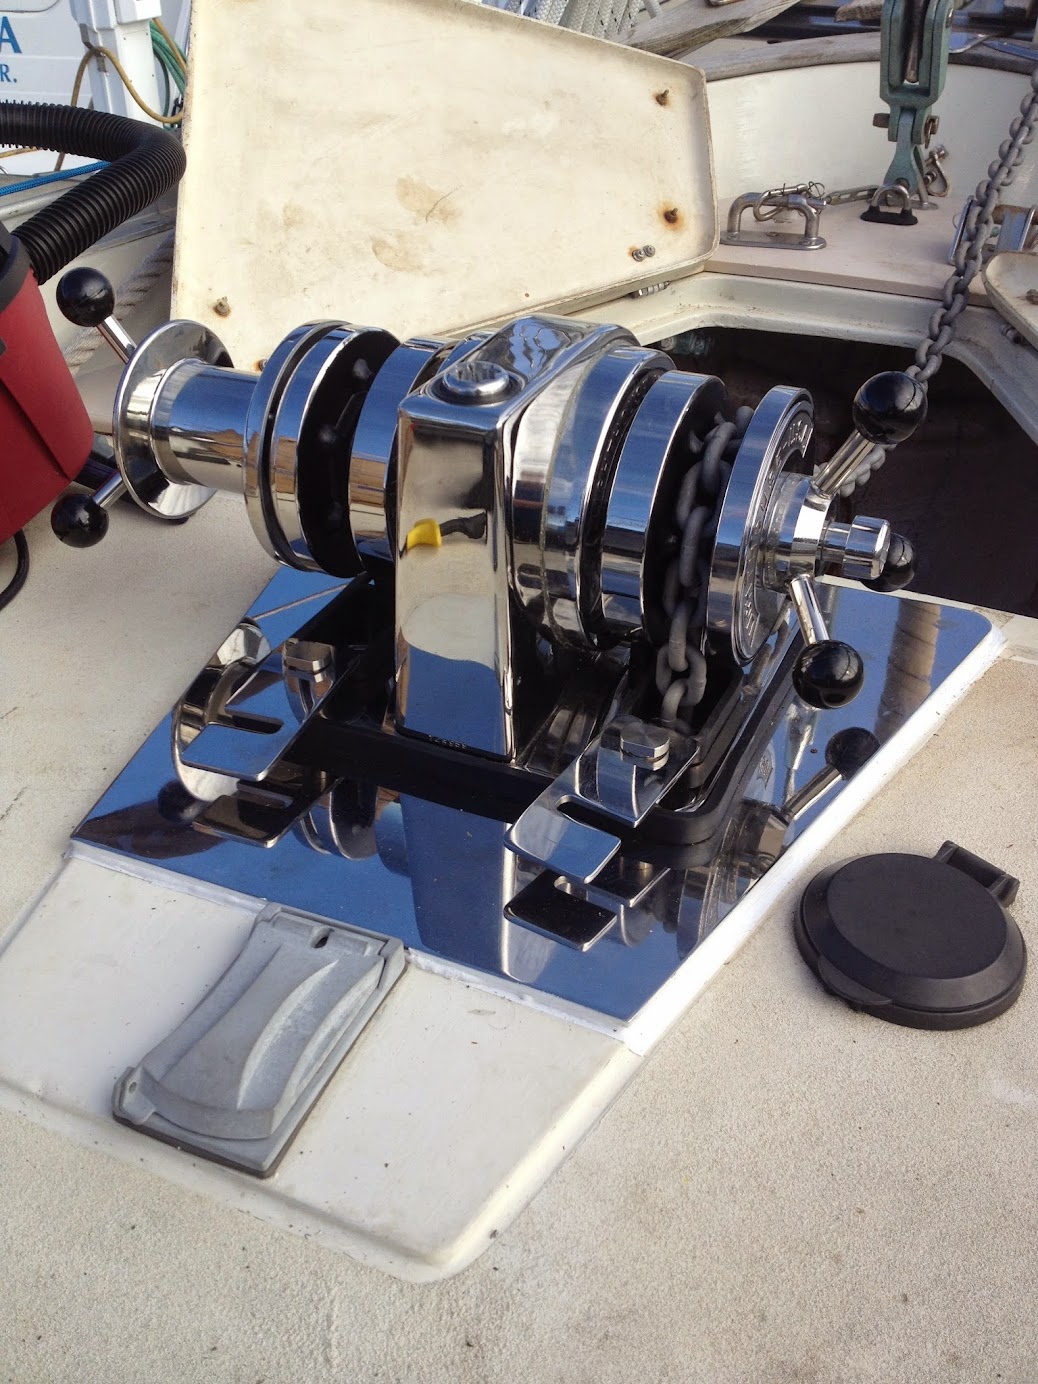
Boat bling. New 1501 Windlass from Lighthouse manufacturing. [Dry fitting after drilling holes through deck...]


A view of the permanent install (looking aft .) You can just make out the yellow drive motor, below. (The loose wiring is for the propane solenoid and was later attached to the underside of the deck.) 

The perforated rubber floor matts in the background are remnants from lining the bottom [2 layers on the bottom...] and all sides [single layer] of the anchor locker to prevent the chain from making direct contact. This prevents unnecessary wear on the hull, quiets the chain in the locker, and allows for water to drain and the chain to dry.

In this view you can [barely] see I had to notch the 3/4" plywood anchor locker divider to allow clearance for the motor. Also note the forward most 1/2" hex bolts on the windlass base. These mate to nuts welded to the backing plate, greatly simplifying installation.

The finished installation. This view also shows the captive, tight fitting slotted stainless hawsehole covers/chain retainers. These fit tightly over the rectangular polyurethane boot which is an extension of the cast polyurethane base which negates the need for any sealant- making future removal of the windlass a simple matter of removing 6 bolts and dropping the motor.

The deck and backing plates were bedded using 3M 4200UV so they could be removed in the future if necessary. 

Preparing to pull [from a full barrel; 550 feet] of 5/16 inch grade 43 chain into the starboard locker [for the first time] to see how much will free-fall. [Ultimately this was done on both sides of the divided anchor locker...]

This is the 'middle' of the 550' length [1 barrel] of 5/16" grade 43 chain after both ends were pulled into their respective chain lockers. It was cut here and attached to the two anchors. [360' for the main bower on starboard; 190 feet for the secondary bower on port.] Both sides have rope rodes attached to the chain.  See our Ground Tackle Inventory page for specific details.


After shot of windlass and anchors in 2014  (60# CQR on port; 80# Supermax as main bower on stbd.) [We later changed our groundtackle configuration...]


Note the 1/2" 'Starboard' installed on foredeck and anchor locker lids to protect fiberglass deck from anchors, chain, etc.


For those who desire even more information, here are the complete details about our groundtackle system.

January 9, 2017

Anchor Windlass

  ➛ ➛ From our list of Stuff we have and use [and do...] in the right sidebar ➛ ➛   


This is part of a series describing some of our boat system refits and their operation. 

We refer to these often not only for our own use, but also when asked specific questions about systems on Denali Rose, and when participating in discussions on various forums. 

We aren't implying our choices are the best or only way to go; they just happen to be the decisions we made...


This post is devided into the following segments: [A table of contents if you like...] 
  • Overview [From the original project blog post Jun-2014]
  • Installation Notes
  • Personal experiences with anchor chain types
  • Lighthouse Windlass Model 1501 Features
  • Additional Resources
  • Windlass Installation Details [Many annotated photos of refit]

———––— Latest revision: 20-Mar-2019 [by Bill] ——––——
[Updated list of related resources...]

Overview:

One of our first projects was installing a new anchor windlass and replacing the old rusted anchor chain. We chose a Lighthouse Manufacturing model 1501 with two chain gypsies and one rope drum. We also replaced the 3/8" BBB chain with 5/16" G43 chain to gain strength while loosing weight- allowing us to add more anchor chain for deep water anchoring.

We can now retrieve two anchors simultaneously if we ever need to... Sweet. 

Boat Bling.
Lighthouse 1501 stainless steel windlass and custom deck plate


The finished install a year later showing 60lb CQR on port, and an 80lb Supermax [main bower] starboard.

Note: Our bow configuration changed in Jan-2017 with a new best bower... 


I
nstallation Notes: [This is presuming perfectly matched ISO chain and gypsy.]
  • All windlasses require at least a 90° wrap of the chain around the chain gypsy to operate correctly under load. [i.e., 1/4 of a turn minimum... more is better...] 
  • Less than 90° can cause the chain to hop on the gypsy under load.
    • This can be more difficult to achieve with a horizontal windlass
    • Too much twist in the chain can also cause hopping/jumping in the chain gypsy
    • Likewise, an athwartship lead-in angle of more than ~3° from the bow roller to the gypsy can cause issues as well with horizontal windlasses
  • Vertical windlasses have less problem achieving a chain wrap exceeding 90°; sometimes that can be a challenge with a horizontal windlass. The athwartship chain lead-in angle is also more flexible on a vertical capstain; vertical lead is in less so. 

To improve the vertical chain lead-in angle for a horizontal windlass, one can either raise the windlass or lower the chain as demonstrated in the following photos on other boats that have the same windlass we installed:


Notes from personal experience with anchor chain:
  • There are many reputable chain manufacturers, and many of the other type... Choose wisely, and most importantly, make sure it fits your windlass...
  • ACCO- the brand we chose [and perhaps others?]- stamps every link with a G4. This is a quick check for authenticity... Many brands stamp every 4th link or so...
  • Since we bought this chain in 2014, with an average of 200+ overnights at anchor/year [averaging 60+ feet of depth i.e., most of the 360ft of main bower chain is submerged most times...] we have only seen rust a bit of rust appear. This has happened where the galvanizing was chipped/abraded off by rocks [or whatever] on the ocean floor- just a few disparate links as of the last update...
  • We rinse our chain with raw water as it is retrieved each time. [i.e., It is stowed with no mud clinging to the chain...]
  • We freshwater rinse our chain every time after it is piled into the chain locker.
  • Don't buy G4 or G7 chain unless they provide a copy of the Proof Certificate from the manufacturer. [One comes with the chain from reputable manufacturers... (One was on top of our barrel of chain...) It is the validation of the results of tensile testing of the length of chain you purchased.]


Lighthouse Windlass Model 1501 Features: [From the manufacturer's website]
  • MULTIPLE OPERATIONAL CAPABILITIES:
    Port and Starboard chain retrieval and payout can be independently operated, or can be simultaneously operated in opposite directions (paying out one while retrieving another) also allows rope wildcats to be operated either independent of chain operations, or in conjunction with chain operations.
  • MANUAL BACK-UP:
    Fast rewind socket port and starboard, or an amazing 10,200 lbs. On 2nd speed, with only 35 lbs. Exerted on a 10" winch handle, in kedging socket located on top of winch. [This is a beast of a manual kedge...] Both manual modes are used in conjunction with a standard winch handle. Rope wildcat allows rapid rope retrieval and can be tailed, even under power.
  • MOTOR DRIVE:
    Continuous duty linear power unit (no field windings to burn out). No external grounding required (unit cannot induce electrolysis). No overload protector required for motor. Reversing is optional without changing the motor. 12v, 24v, 32v, 110/220 VAC, and Hydraulic power are available.
  • CONSTRUCTION:
    All stainless steel type 316L construction, sealed case lifetime lithium lubrication, mounted to built-in base plate. Comes with chain pipes and cast urethane deck seal. [We clamped 2" ID exhaust hose to both SS chain pipes below deck to direct and quiet the chain.]
  • MOUNTING:
    Required deck space for mounting plate is L10" X W11.6", bowsprit mounts L12" X W4". Mounts with (6) ½" bolts. Motor mounts under deck and requires only 2" hole. Optional [SS] backing plates are available from the factory. [We had one custom made for a very reasonable price.]
  • GYPSY and WILDCAT:
    Standard cast bronze chromed gypsy and stainless steel wildcat port and starboard. ¼" through 7/16" BBB, PC, or System 40 HT are standard, others available on request.
  • POWER CONSUMPTION:
    • 12v: free run=8amps/rated pull=80amps
    • 24v: free run=4amps/rated pull=40amps
    • CAPACITIES:
      Continuous line pull at 12v - 32v 1000 lbs. @ 37 fpm.
      Maximum, depends on available amperage from power supply.
    • DIMENSIONS
      Height: 8" (203.2mm)
      Length: 9.5" (241.3mm)
      Width: 24" (609.60mm) [This is for the dual gypsy, dual rope drum model.]
      Weight 110 lbs. (50.00 Kg)
      Depth: From top of deck: 14.5" (368.3mm). Unit will accept up to 4.5" (114.3mm) deck thickness as standard. Optional extension housings to 48"

    Additional Resources:

    Windlass Installation Details:

    Following is a storyboard of photos [with detailed annotations] demonstrating and describing the retrofitting of a new Lighthouse windlass on Denali Rose's foredeck. 

    Original Nico Marine windlass (ç 1983) and 3/8" BBB chain.

    The green tape is what I used for marking the layout of the new windlass. [Note: Starboard chain is not in its gypsy in this shot; it is temporarily draped over the clutch wheel so it is out of the way for measuring.]


    Laying out new windlass.

    Note: the anchor locker divider (3/4" marine plywood-resin coated) is intensionally off-set slightly to port. [i.e., The starboard locker is larger and so will be used for main bower...]


    Triangular top [deck] plate is in the lower left of this field drawing, and is shapped to match the existing raised section on deck. The rectangular backing plate is on upper half of drawing.


    Out with the old... and reconfirm layout...


    Dry fitting new deck plate; marking bolt holes for drilling. The yellow canister is the windlass motor encased in a kevlar wrap with a molded urethane base that has a removable bottom to accommodate water tight wire penetrations.


    Swiss cheese deck from old and new windlass holes. This is why I had the custom deck plate and large backing plate fabricated. [Both are 1/4" thick 316 stainless steel and will be bonded with 3M 4200UV- VS. 5200- to accommodate future removal if necessary...]

    Note: Nauticat does not use any coring in their hand layed-up fiberglass hulls- including the deck. The deck was just shy of 1 inch thick were these holes are.


    Backing plate placed on top of deck plate [for reference] to demonstrate layout and coverage...

    The backing plate lower right corner [in photo] is notched because I didn't have time to remove the old foot switch which has a ~2 hole through the deck. This hole will become a small, clear deck plate for viewing the propane A-B switch in the future.

    In retrospect, I wish I had removed the rectangular grey cover securing a since abandoned 12 VDC outlet, and extended the SS deck plate over that hole as well...

    Also note the 2 inch ID tubes welded to the backing plate where the two chains lead through  [i.e., hawseholes...] Those tubes are long enough [1 inch to match deck thickness- per my request] to mate with the SS deck plate [protecting the non-cored deck from the anchor chain] and extend another 2 inches into the anchor well. These are for clamping 2 inch ID exhaust tubing to for leading the chain in the chain locker [and quieting any rattling...]


    Boat bling. New 1501 Windlass from Lighthouse manufacturing. [Dry fitting after drilling holes through deck...]


    A view of the permanent install (looking aft .) You can just make out the yellow drive motor, below. (The loose wiring is for the propane solenoid and was later attached to the underside of the deck.) 

    The perforated rubber floor matts in the background are remnants from lining the bottom [2 layers on the bottom...] and all sides [single layer] of the anchor locker to prevent the chain from making direct contact. This prevents unnecessary wear on the hull, quiets the chain in the locker, and allows for water to drain and the chain to dry.


    In this view you can [barely] see I had to notch the 3/4" plywood anchor locker divider to allow clearance for the motor. Also note the forward most 1/2" hex bolts on the windlass base. These mate to nuts welded to the backing plate, greatly simplifying installation.


    The finished installation. This view also shows the captive, tight fitting slotted stainless hawsehole covers/chain retainers. These fit tightly over the rectangular polyurethane boot which is an extension of the cast polyurethane base which negates the need for any sealant- making future removal of the windlass a simple matter of removing 6 bolts and dropping the motor.

    The deck and backing plates were bedded using 3M 4200 so they could be removed in the future if necessary. 


    Preparing to pull [from a full barrel; 550 feet] of 5/16 inch grade 43 chain into the starboard locker [for the first time] to see how much will free-fall. [Ultimately this was done on both sides of the divided anchor locker...]


    This is the 'middle' of the 550' length [1 barrel] of 5/16" grade 43 chain after both ends were pulled into their respective chain lockers. It was cut here and attached to the two anchors. [360' for the main bower on starboard; 190 feet for the secondary bower on port.] Both sides have rope rodes attached to the chain.  See our Ground Tackle Inventory page for specific details.


    After shot of windlass and anchors in 2014  (60# CQR on port; 80# Supermax as main bower on stbd.) [We later changed our groundtackle configuration...]

    Note the 1/2" 'Starboard' installed on foredeck and anchor locker lids to protect fiberglass deck from anchors, chain, etc.


    For those who desire even more information, here are the complete details about our groundtackle system.